Create/Sync Your Drivers With Motive
Registering your AscendTMS drivers with Motive is unbelievably easy. If you are not sure how to add drivers into your TMS, please visit our support article HERE.
*Note* If your drivers are already using the Motive app, please ensure that the email and Motive Username within their Driver Profile of AscendTMS, matches the email or username that they are currently registered with in Motive.
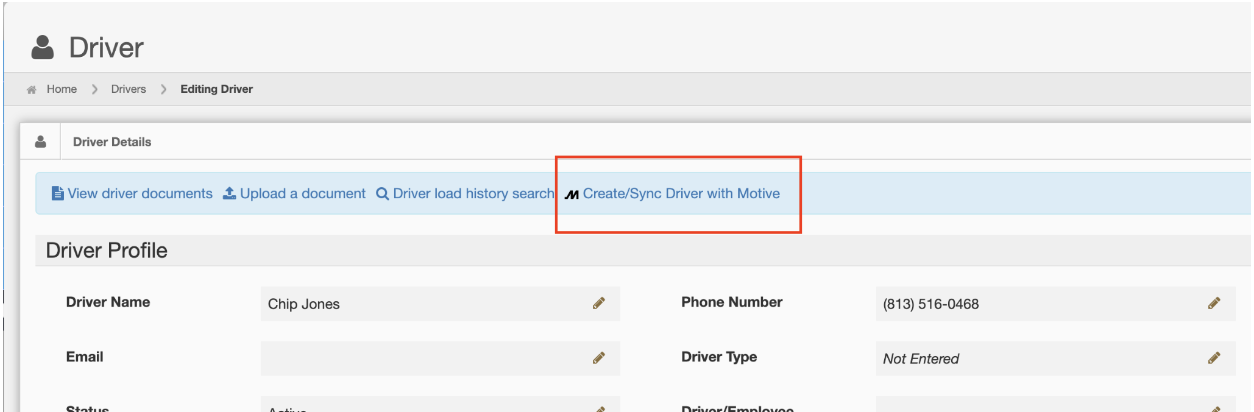
If you wish to link a previously created Ascend Driver Profile with a previously created Motive Driver Profile, you can click the Create/Sync Driver with Motive button as shown below from within a Driver Profile on Ascend:
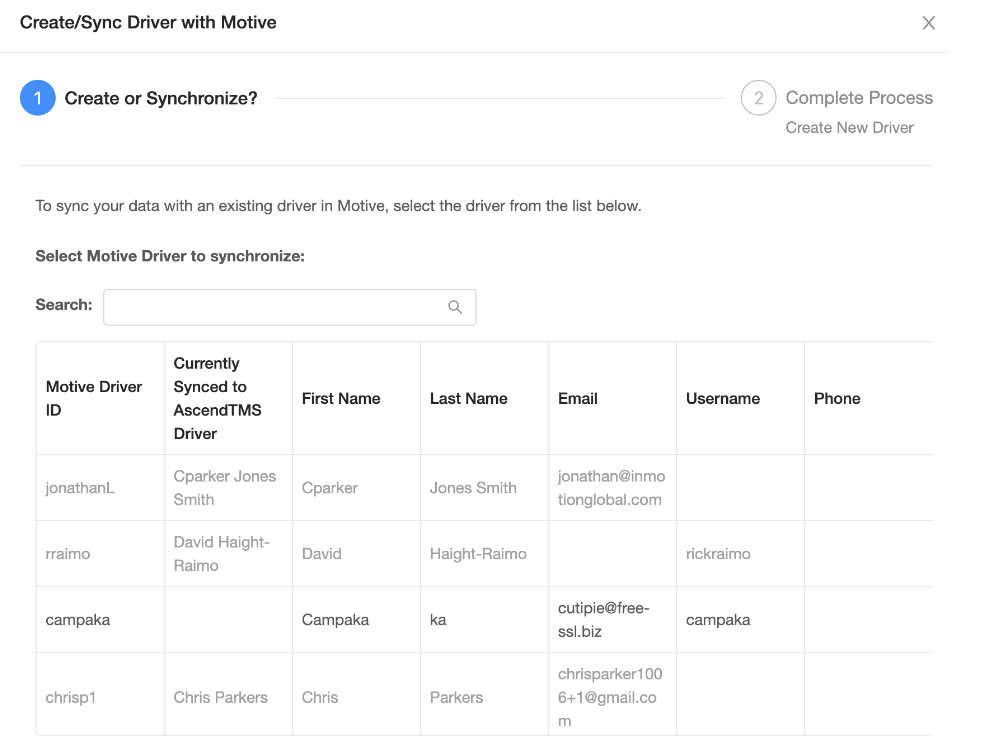
This will open the modal below, where you can select a Driver Profile from Motive to link to the Ascend Driver Profile you are currently in:
Once you select a driver to Sync, you will get the below modal:
Once you have made the selections that you would like to sync and keep on both driver profiles (Ascend and Motive), click the Sync Driver button to sync and save.
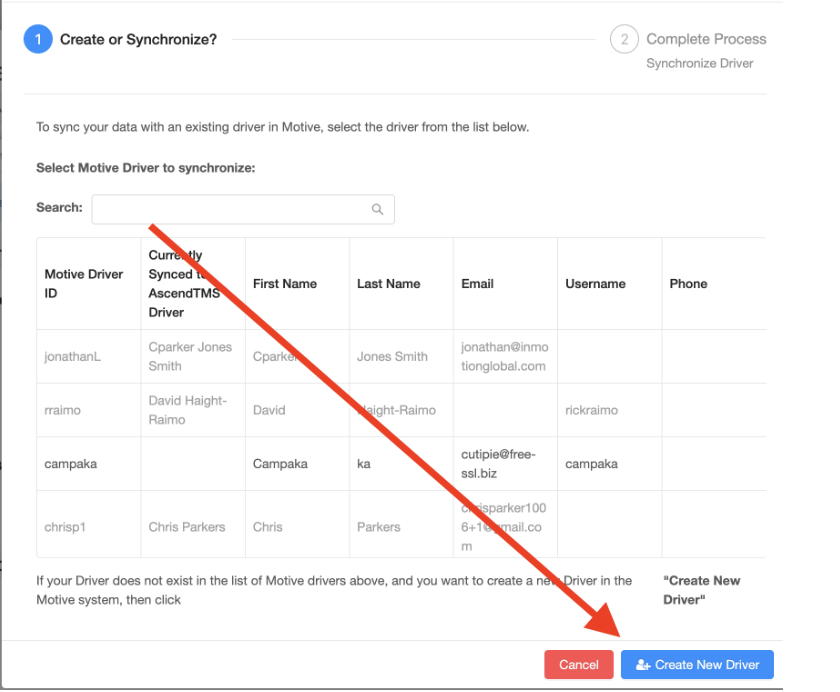
If the Driver profile you have created in Ascend does not have a profile in Motive, you will want to click the Create New Driver button as shown below:
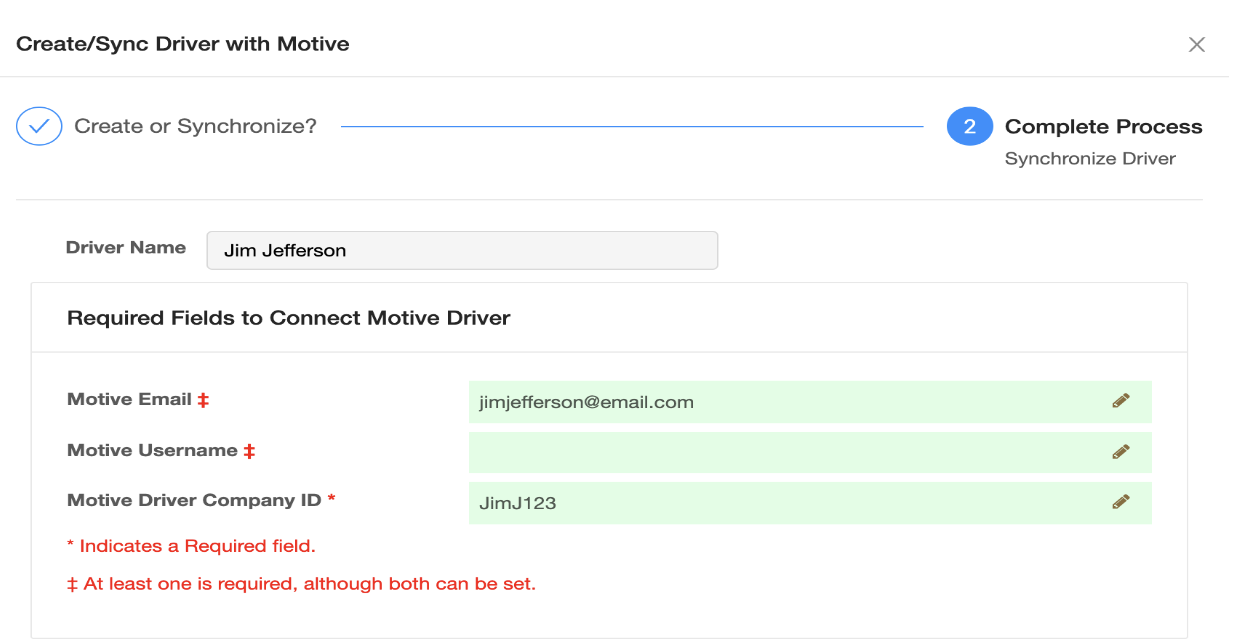
Once you click the Create New Driver button, you will get the below options to fill out for the Motive Driver Profile to be created:

A successful registration will pop open a green banner at the top of AscendTMS and a message reading This Driver is linked to Motive will appear under the ELD Information section of the Driver Profile. Here you will also have the ability to Stop Syncing a driver with Motive, and to reset the password for the Driver’s profile in Motive.


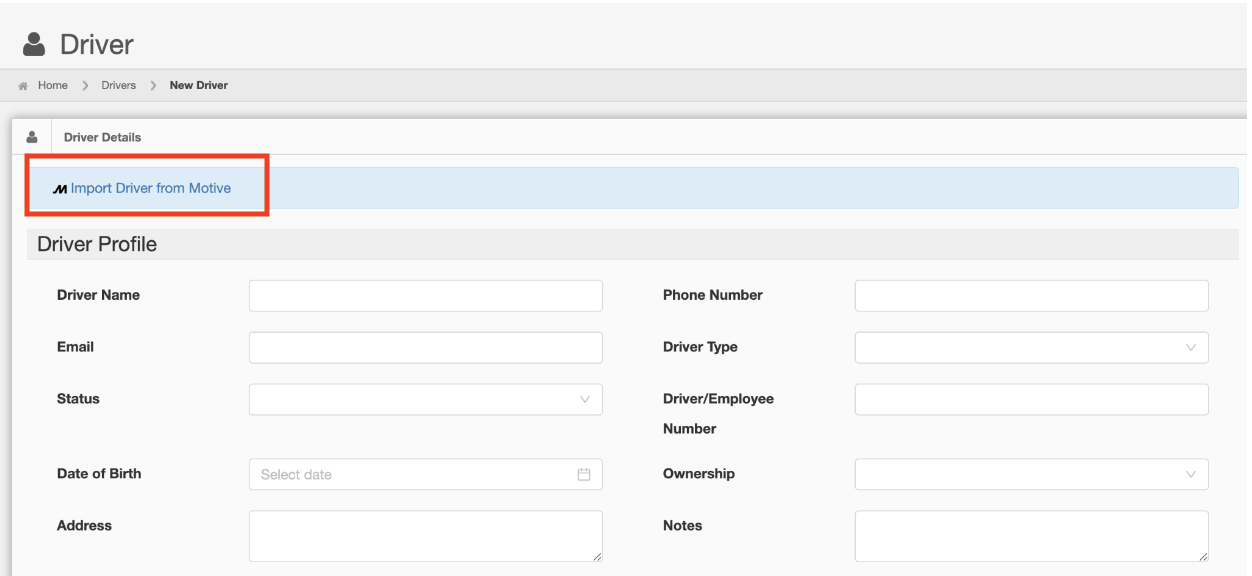
The third option that is available for adding a driver, is to click Add a New Driver, and when the blank driver profile shows up, at the top there is the option to Import Driver from Motive.
When you click Import Driver from Motive button, you will see the below modal:
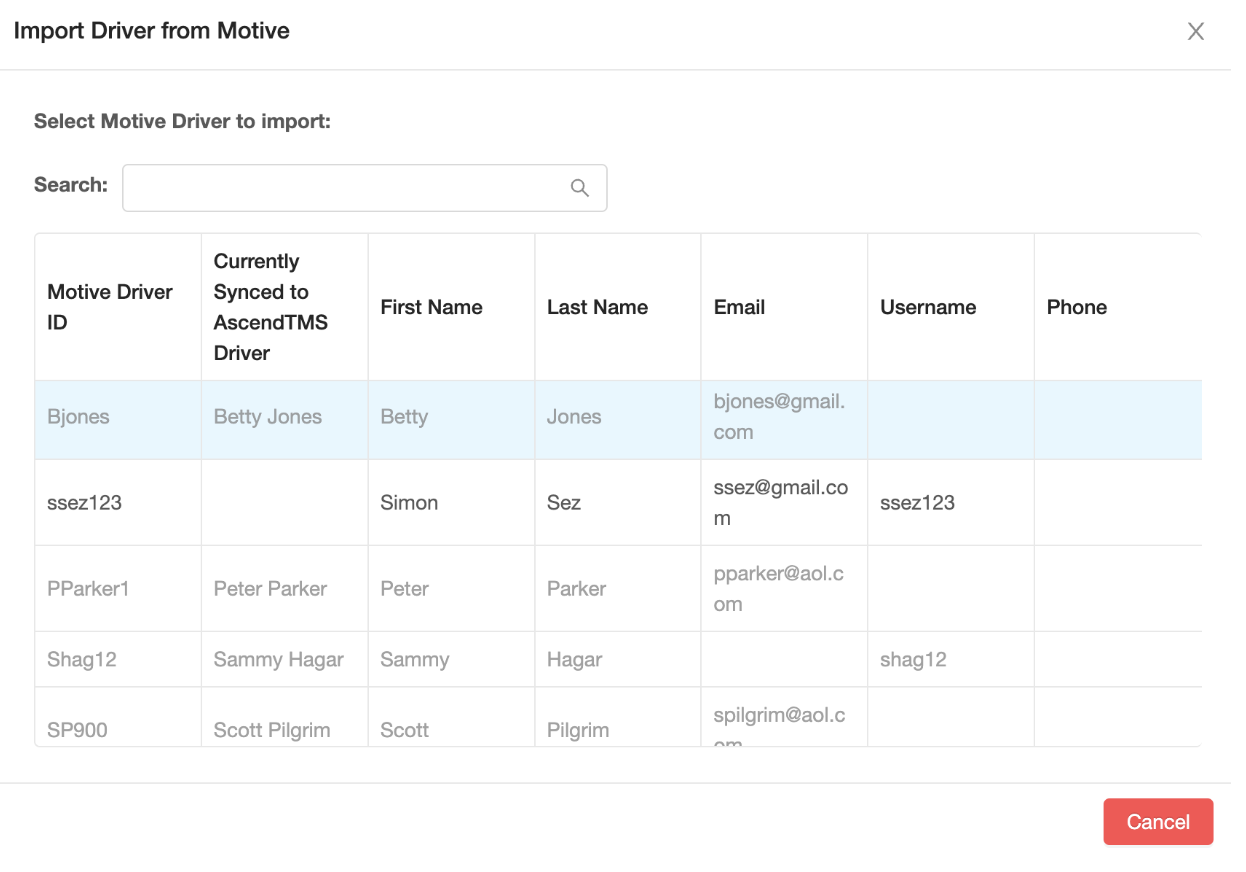
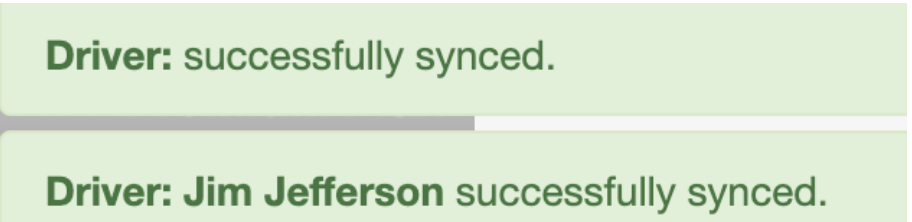
Once you select the driver that you would like to import from Motive, you will then see the below banners confirming the import from Motive to Ascend:
Initiate Auto Tracking On Your Load
To unlock the magic of your Motive integration, start by assigning your Motive registered driver to a load. If you are not familiar with how to assign a carrier to a load, please visit our support article HERE.
From the Shortcuts menu in Load Management or from the Load Actions bar at the top of the load, you will select Dispatch & Tracking and the modal below will appear.

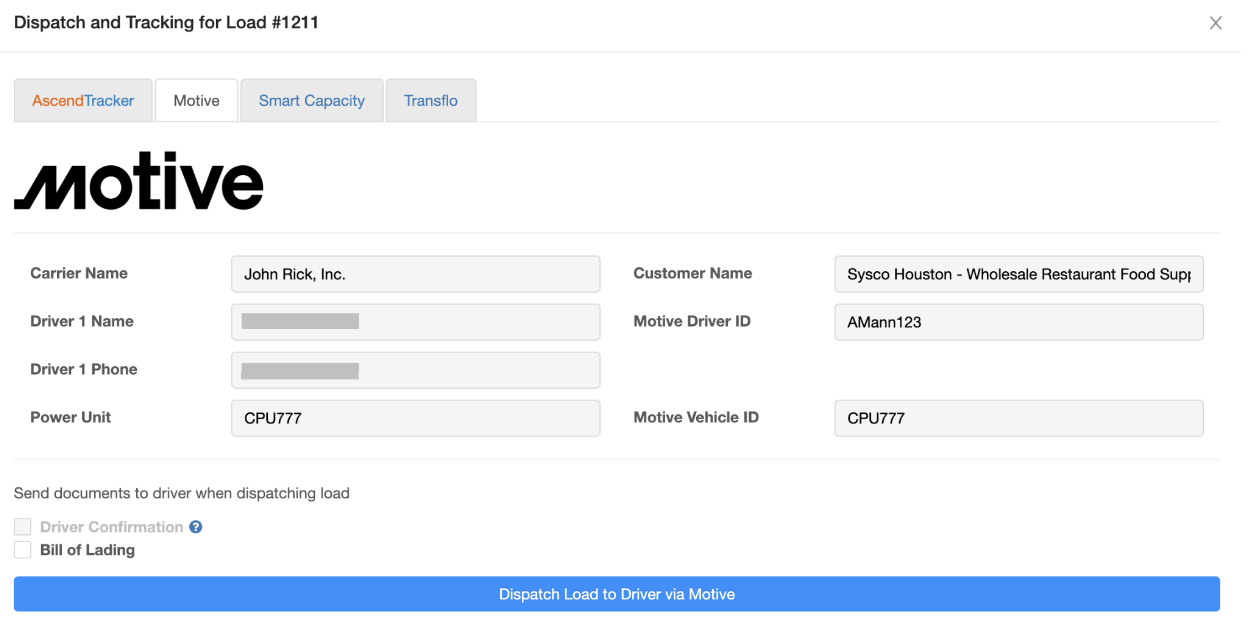
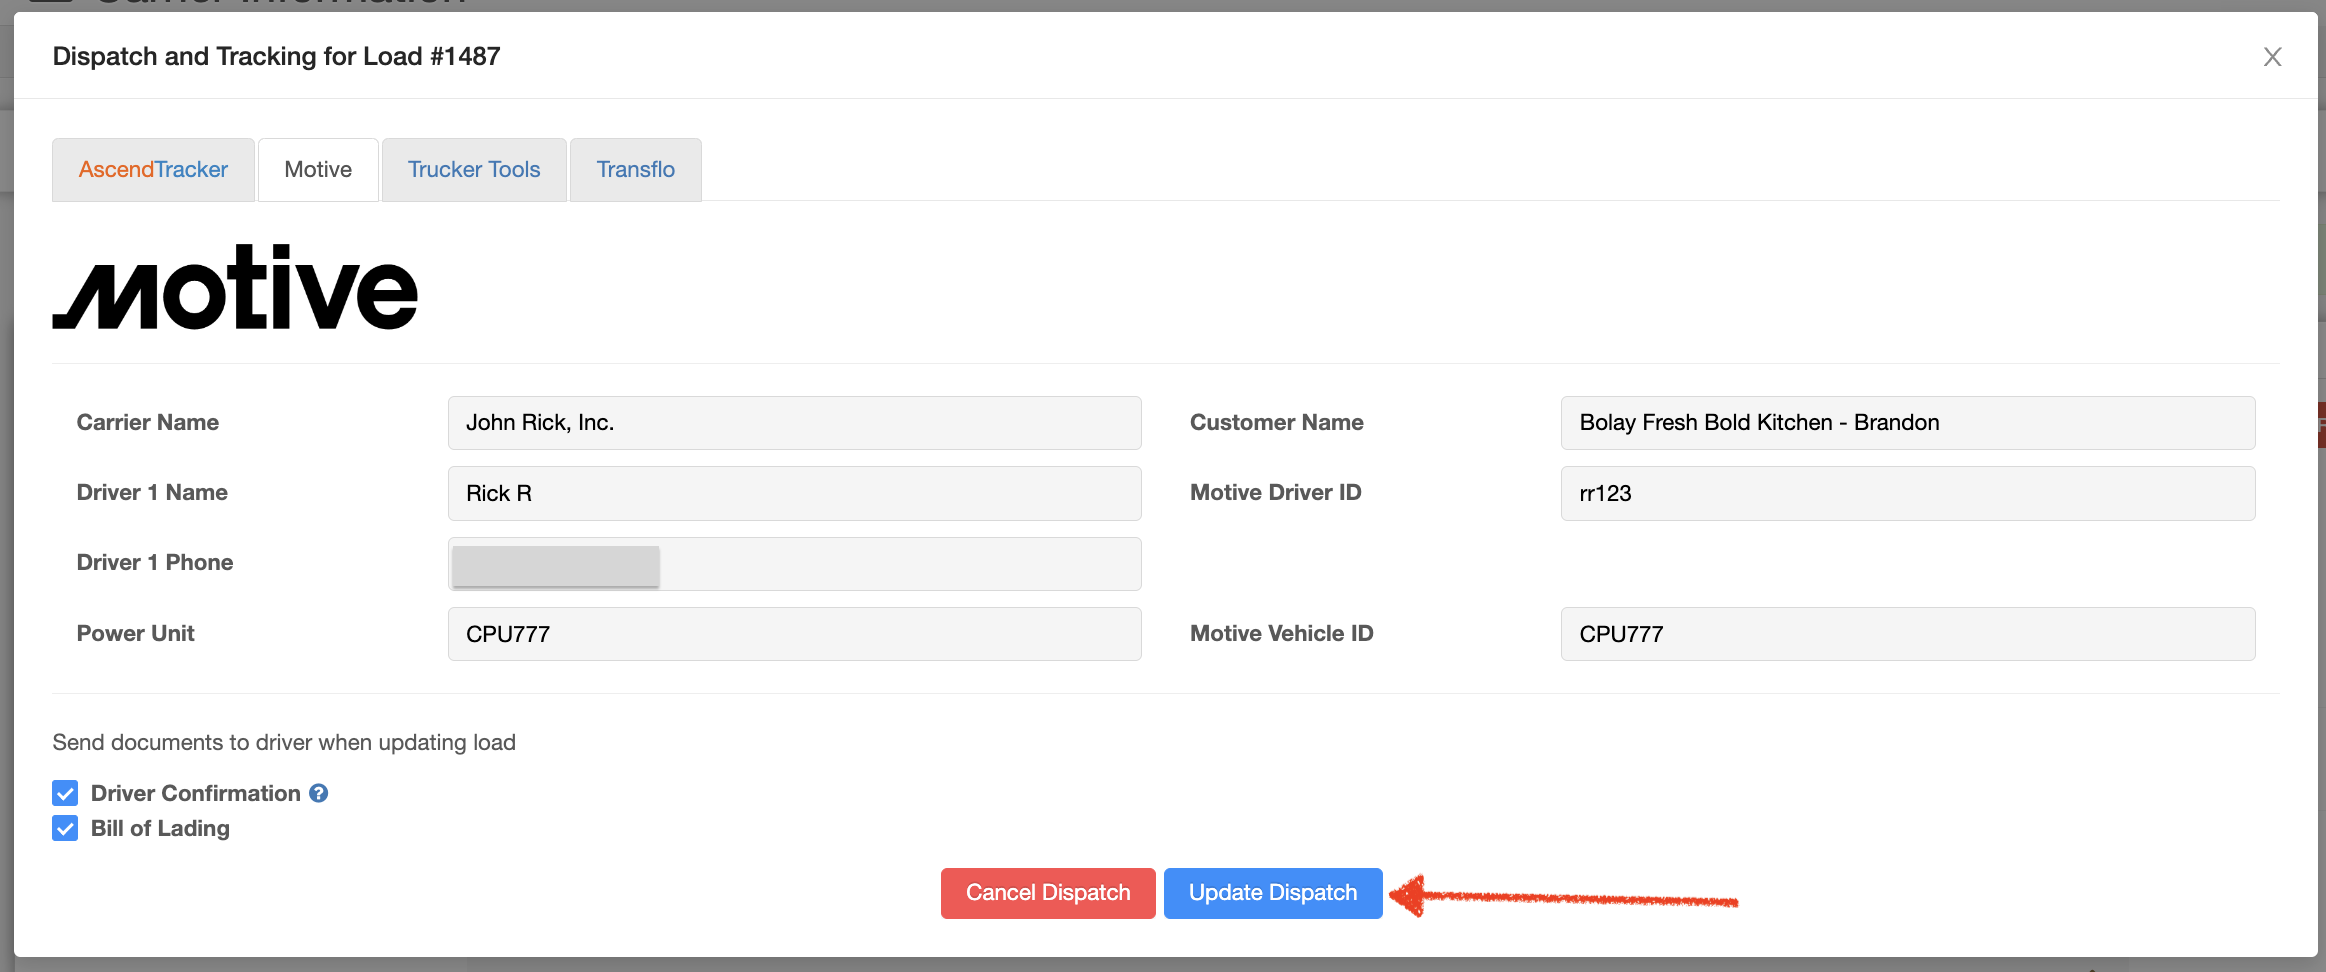
Once you choose Dispatch and Tracking, a modal for all tracking integrations will pop-up and you will then choose Motive.
Once the Motive tab has been selected, you will then click the large blue Dispatch Load to Driver via Motive button to dispatch the load information to the driver via the Motive App.
When a driver receives a dispatch, they will see the below on their Motive Driver App with the options to review the dispatch and then accept:
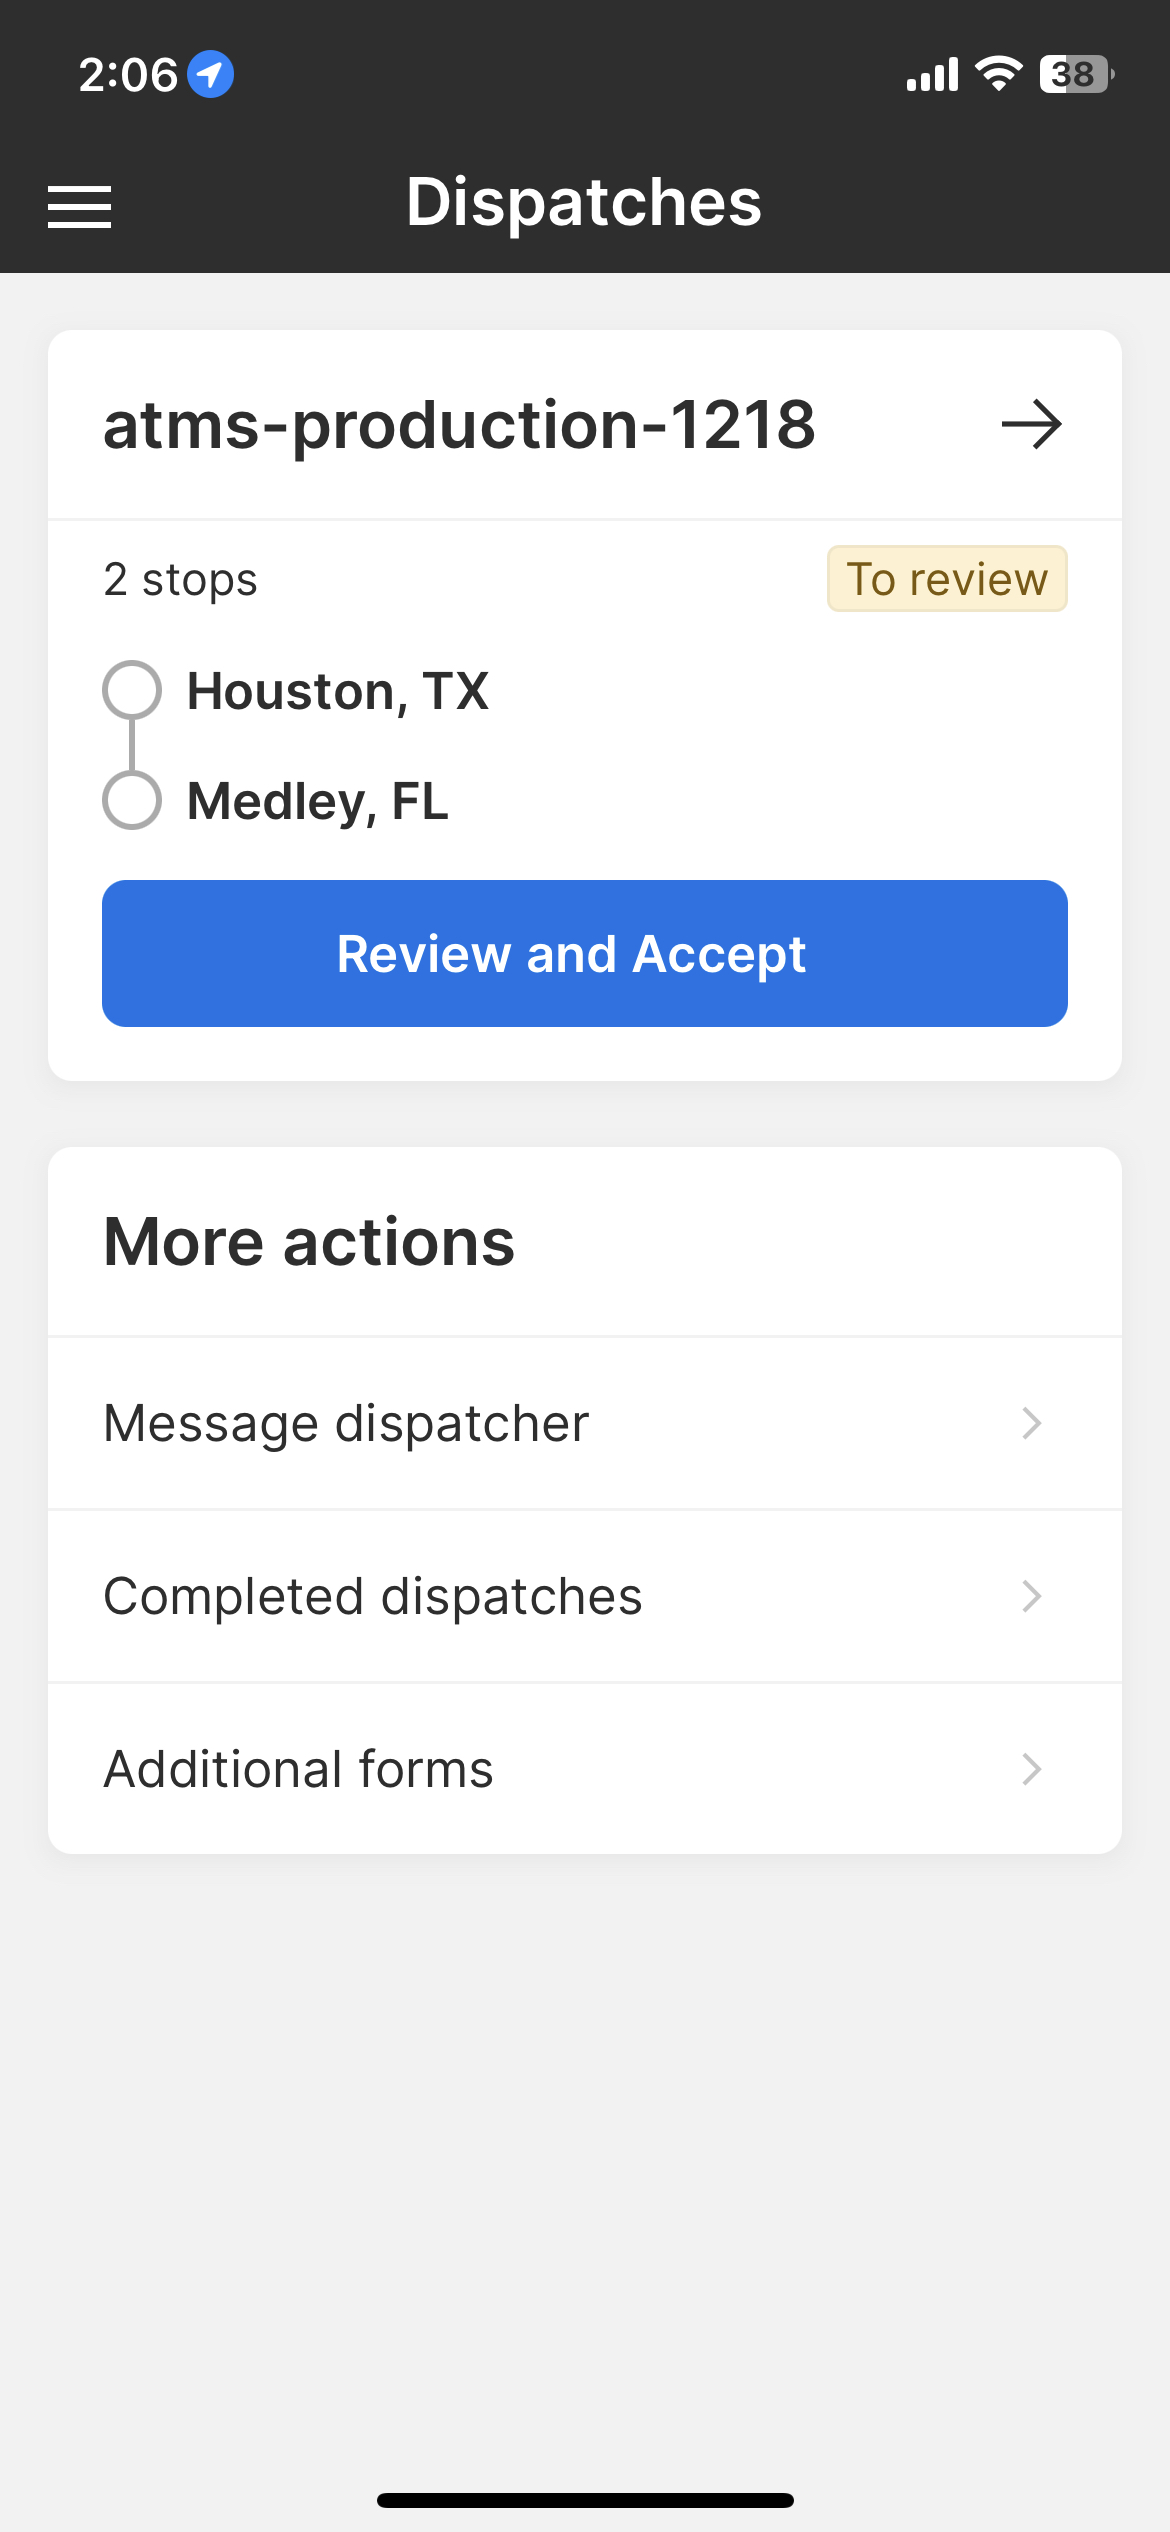
Once the Driver clicks 'Review and Accept', they will see the option below that will allow them to view the details and start the dispatch:
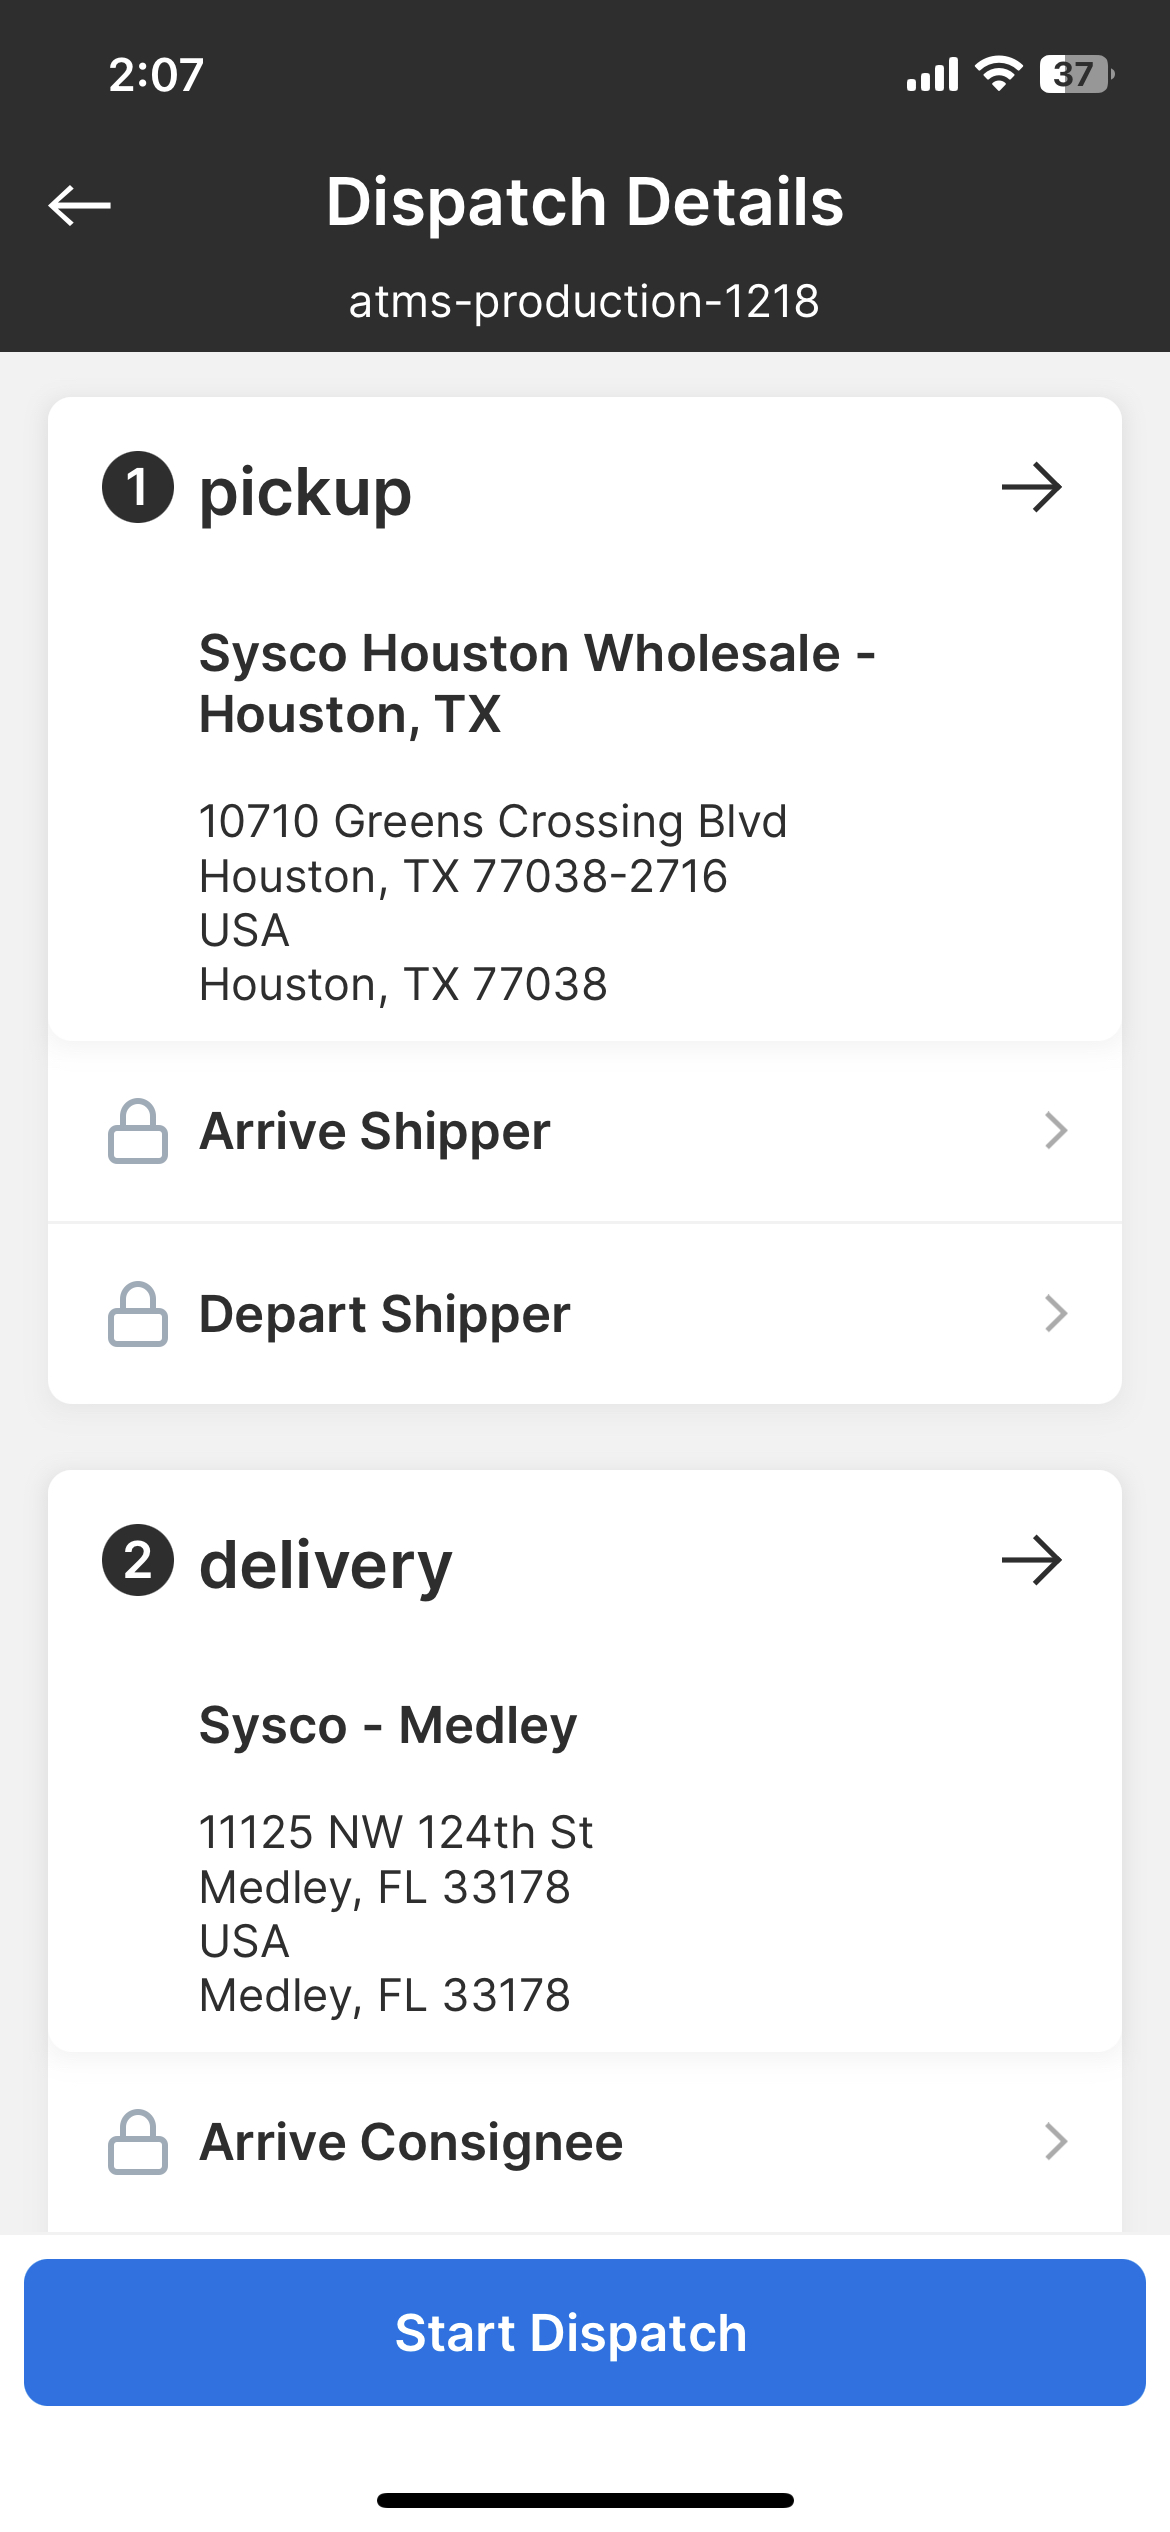
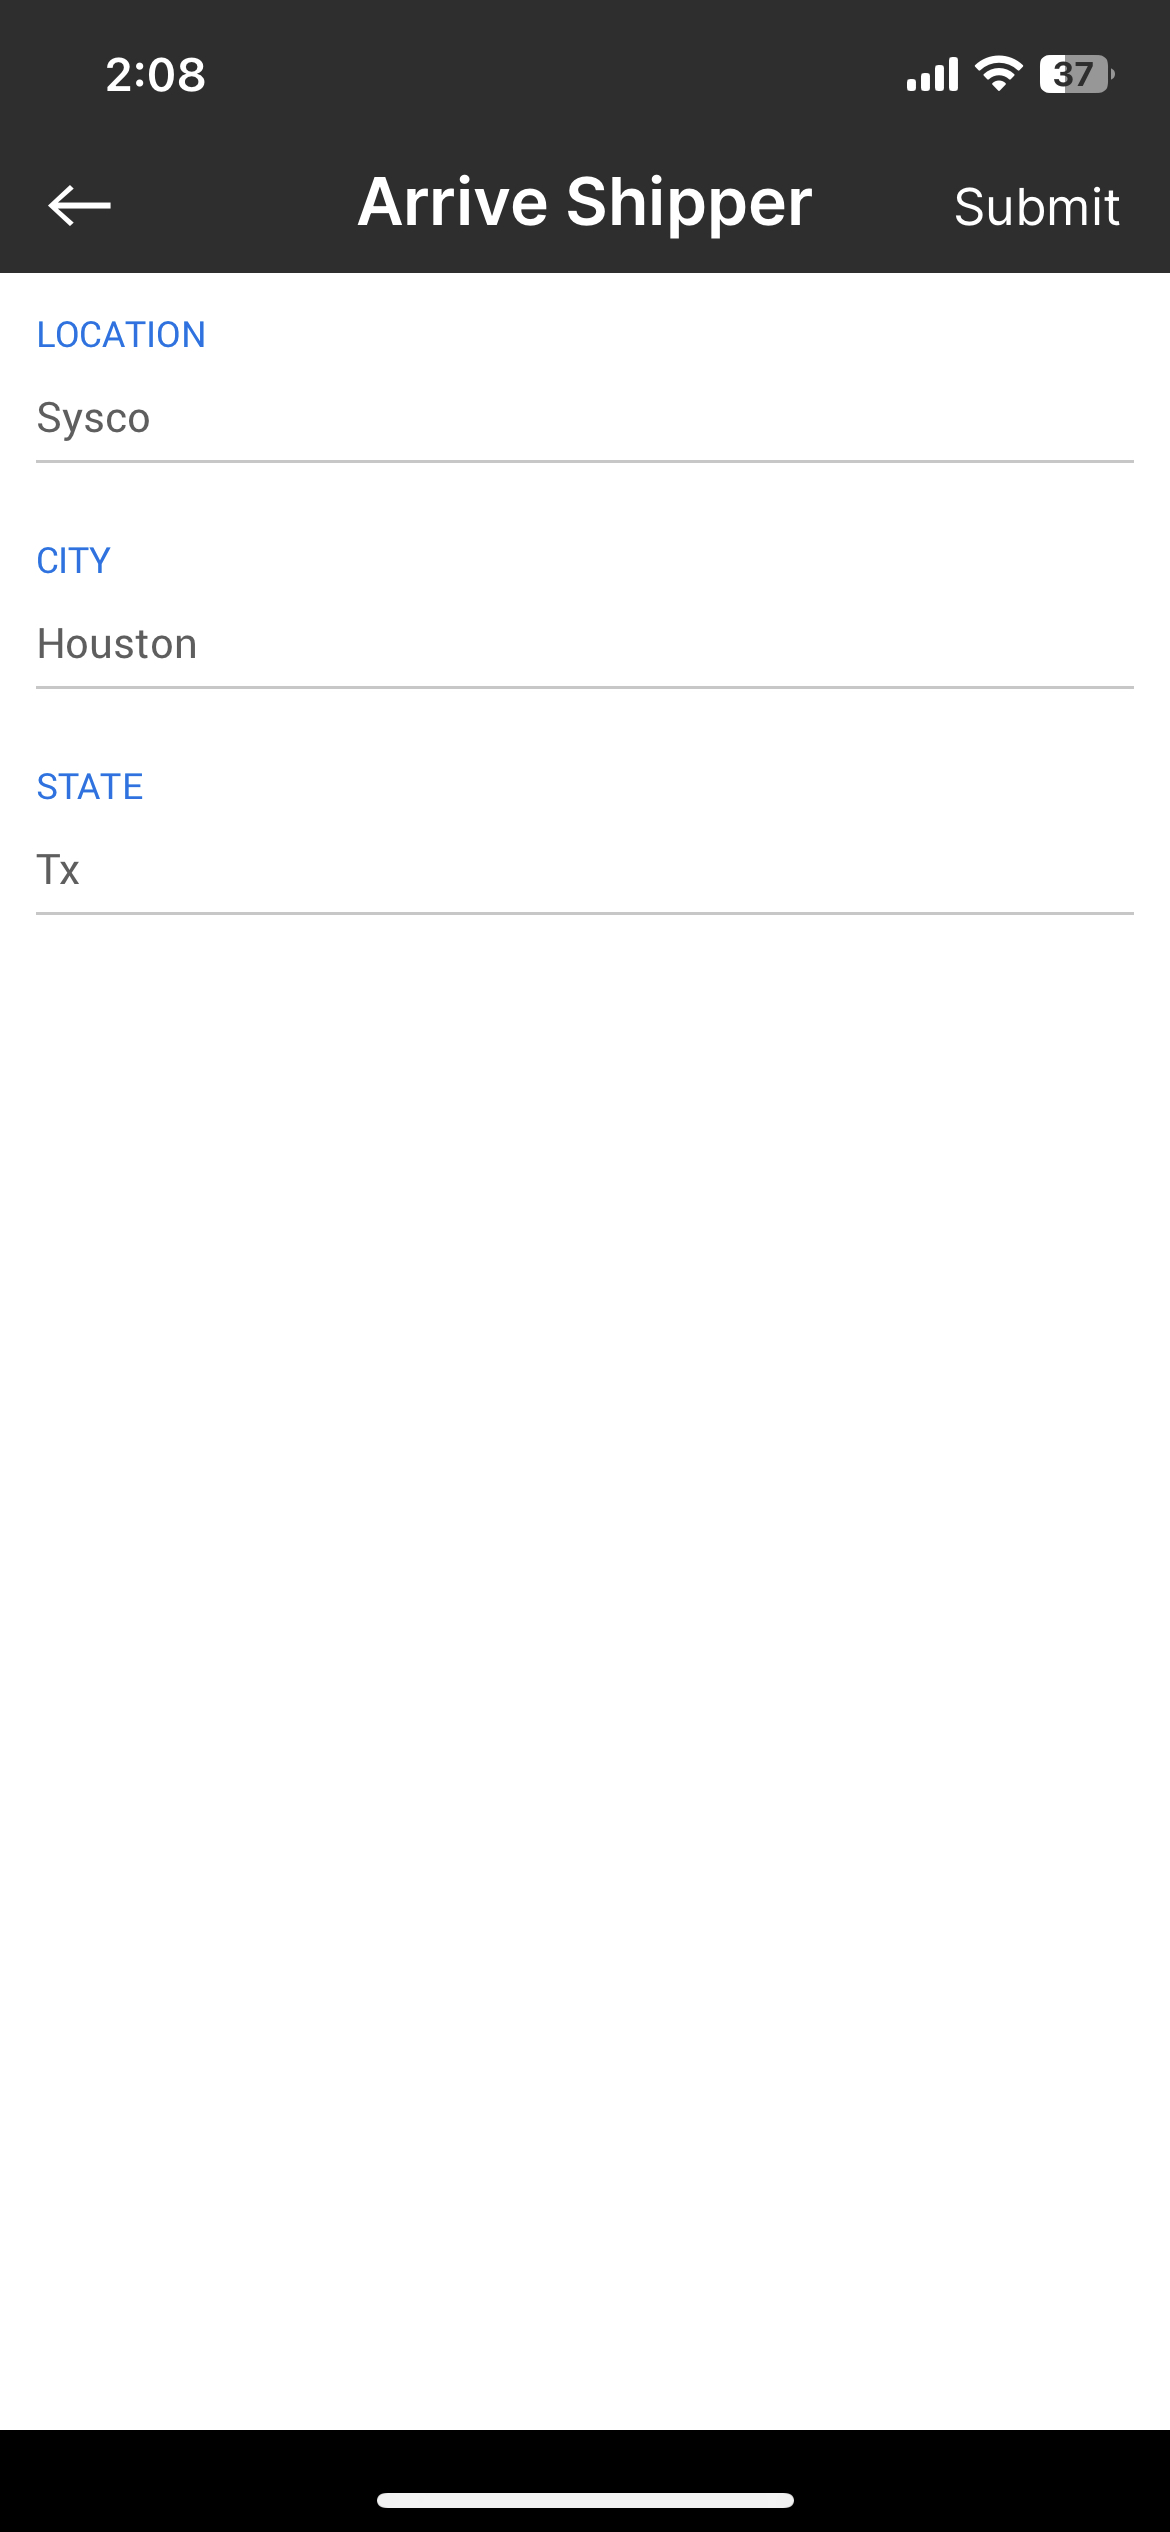
After the Driver clicks 'Start Dispatch', they will be able to record the details of each arrival and departure, as seen below:
If for any reason you need to update the load with adjusted pick or drops, appointment times, drivers or power units, you can send the driver an updated dispatch as well as documents. Once you change the load details, you will go to Dispatch and Tracking and choose Update Dispatch. The driver will then get a notification on his app as well as updated documents.
As the Driver updates the info in their app, you will receive the updates within Ascend! Below you can see the updates from the above app screenshot, as the look once submitted to Ascend:
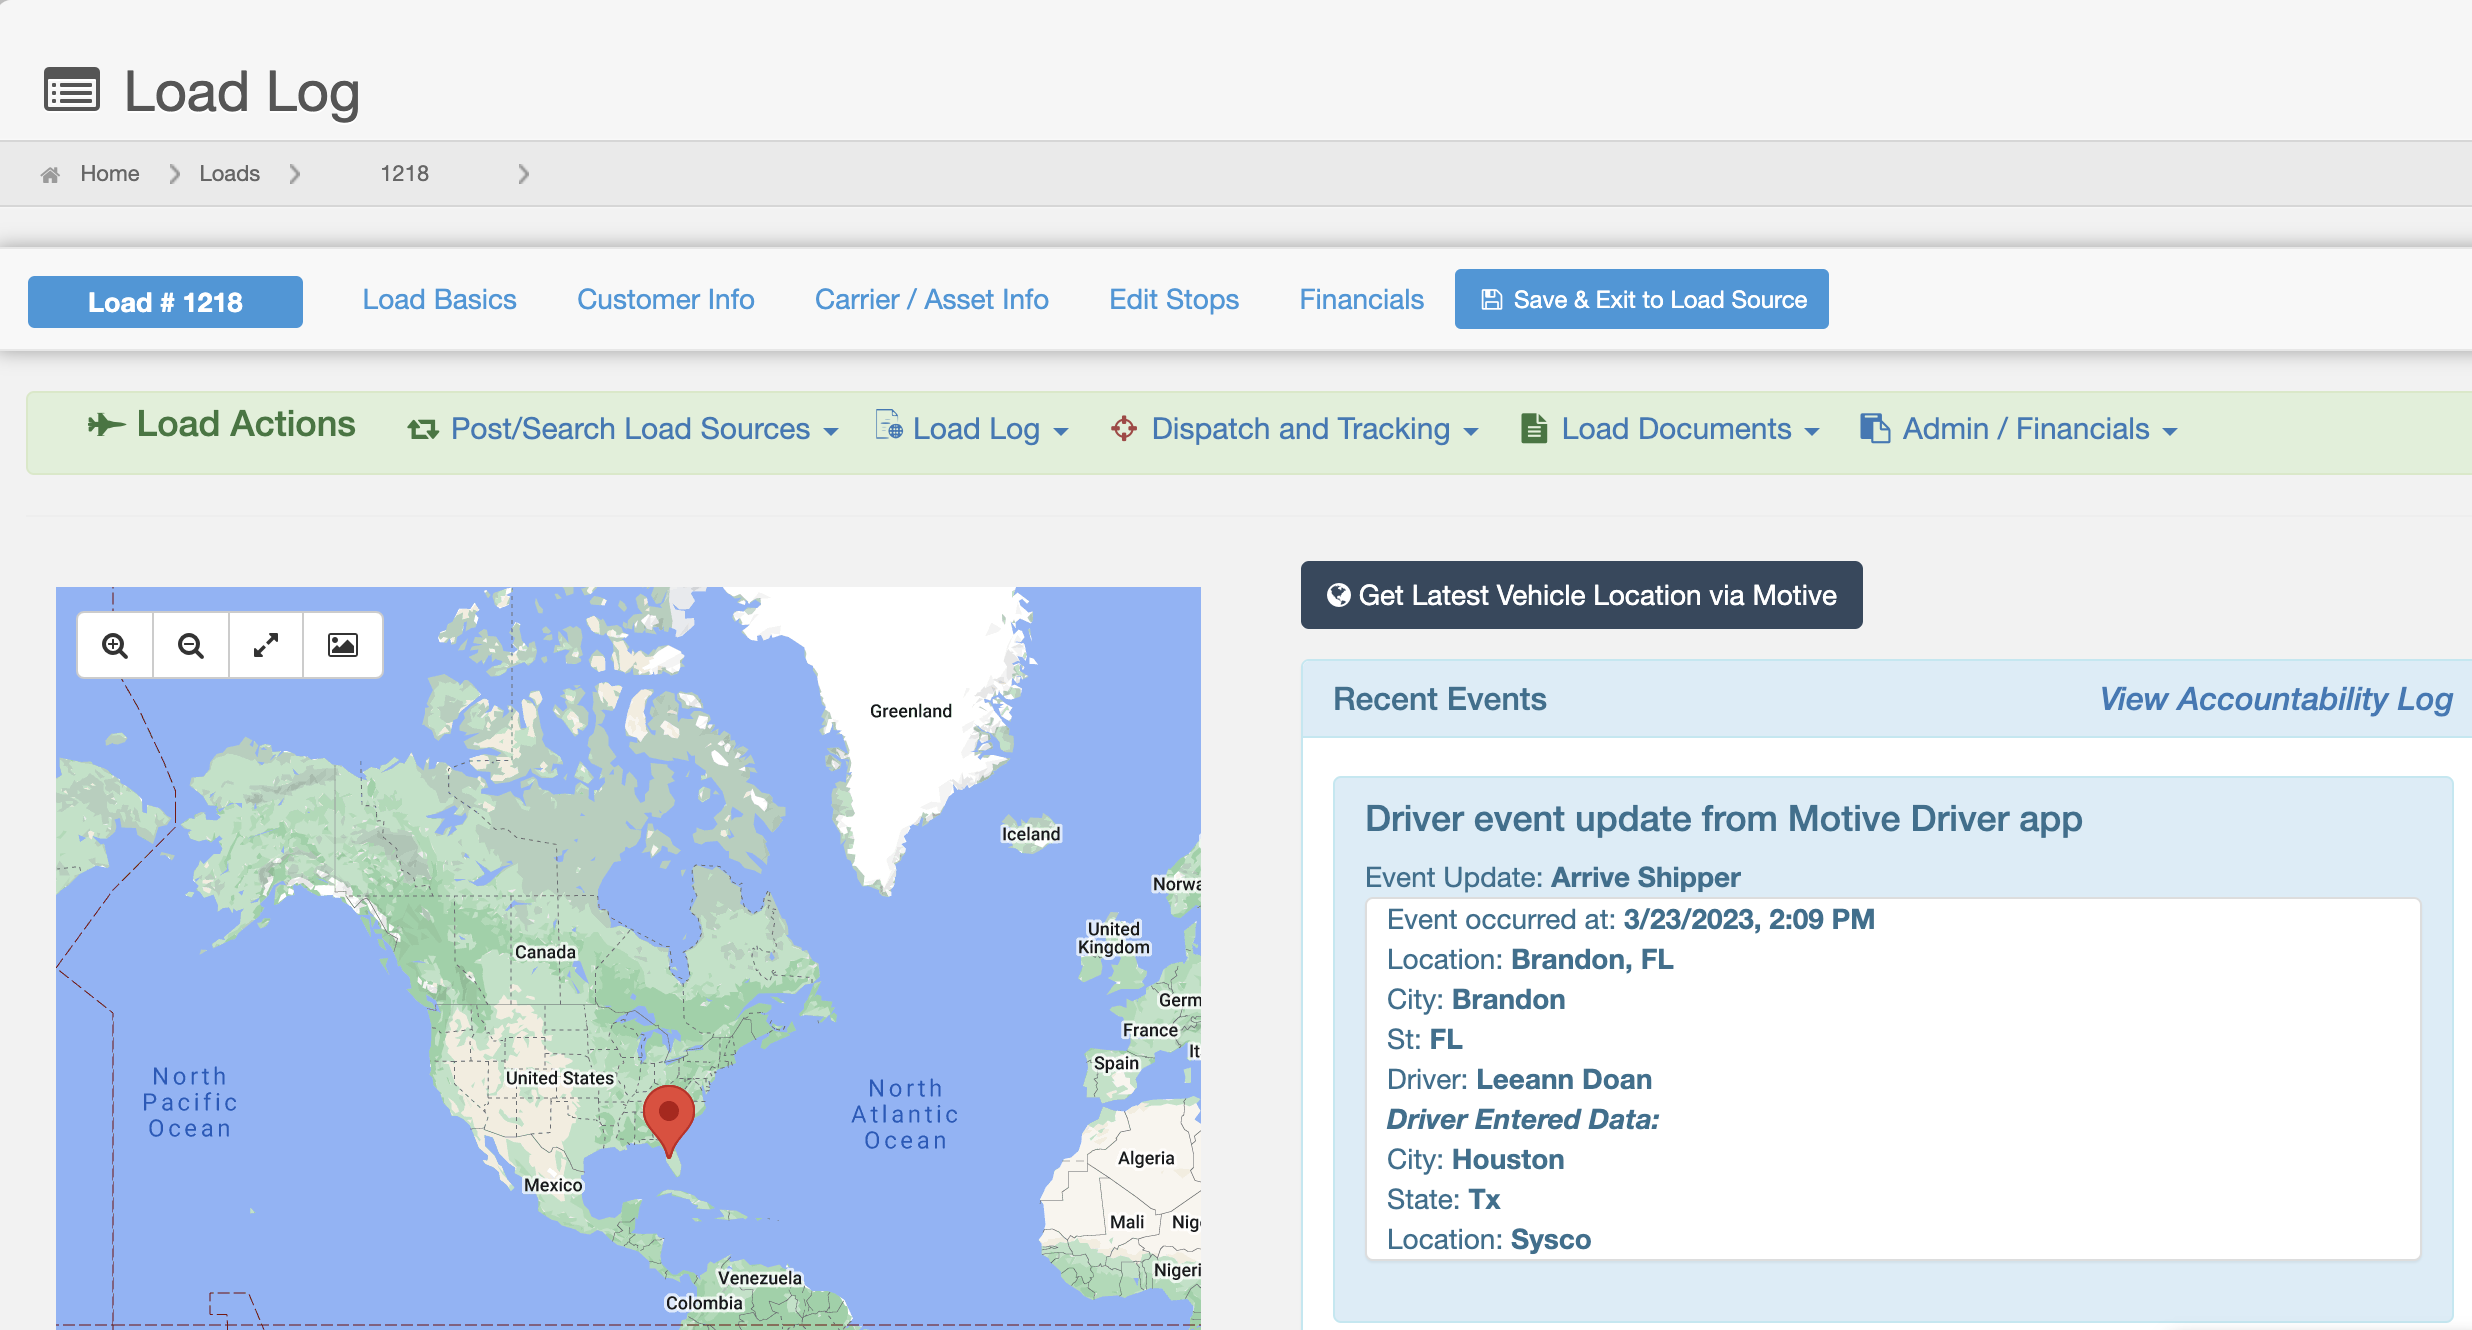
As you can see in the above screenshot, you can see the information that the Driver added in the app, as well as the information that the Motive Driver app is sending over.
Load Updates and Document Upload
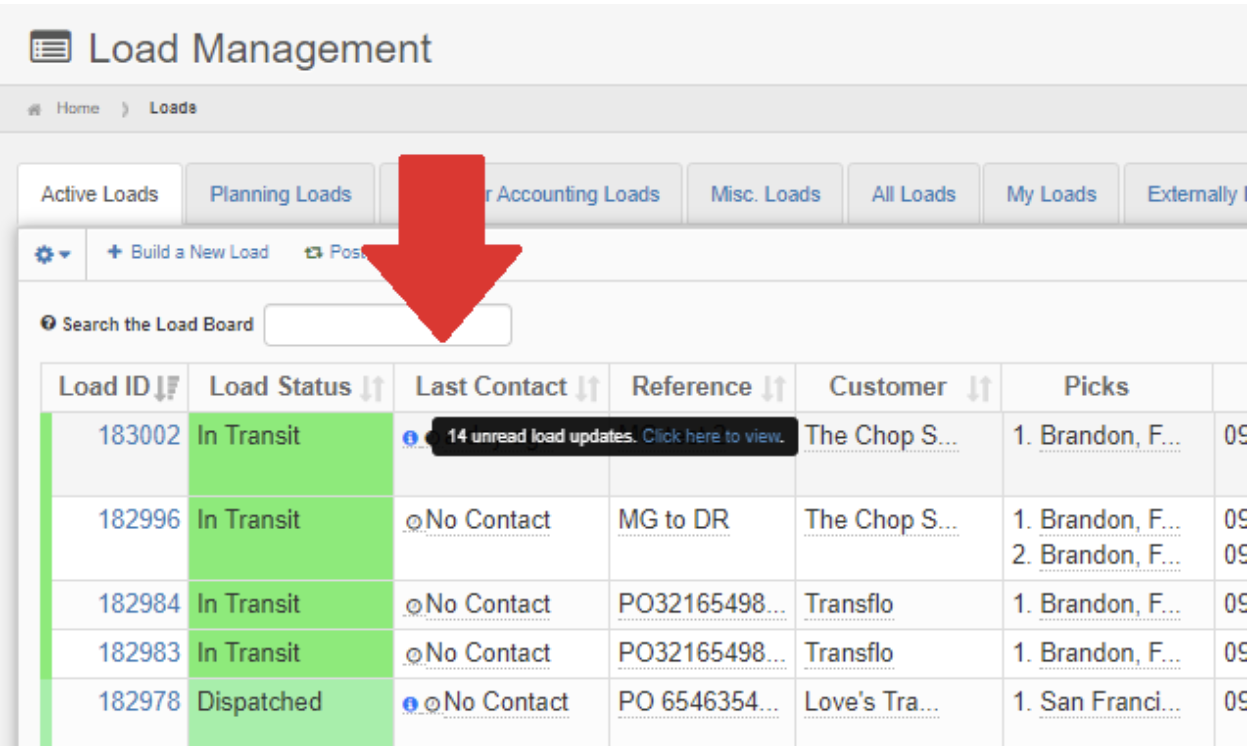
All load updates are kept within your Load Log for easy reference. Once you have dispatched the load to the Driver (see above), the driver then has the ability to send updates every step of the way! As they are updating the status of the load, this information will return into your AscendTMS automatically and be visible within your Load Log.
First, you will get an indicator within your Last Contact column letting you know you have updates:
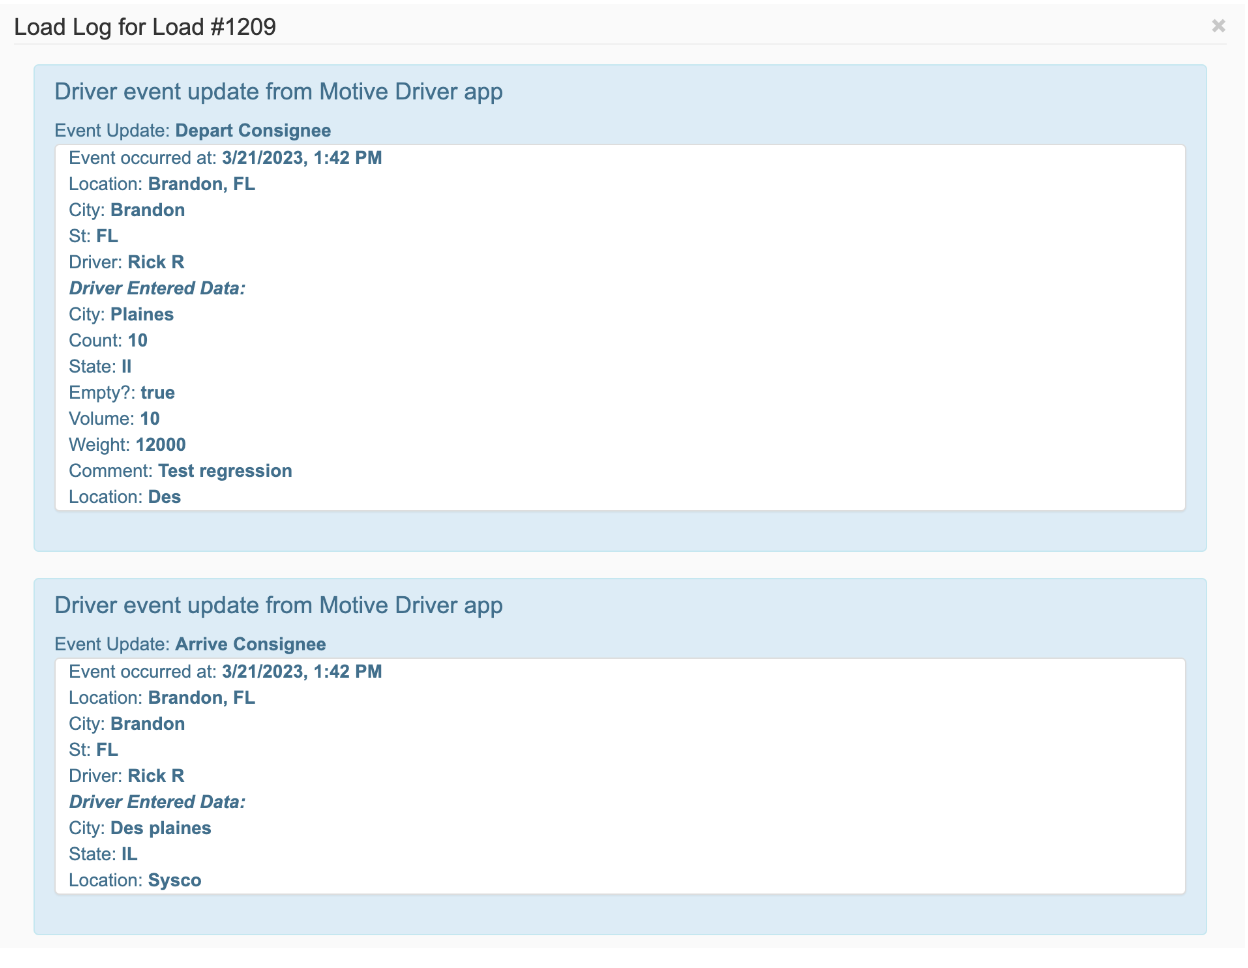
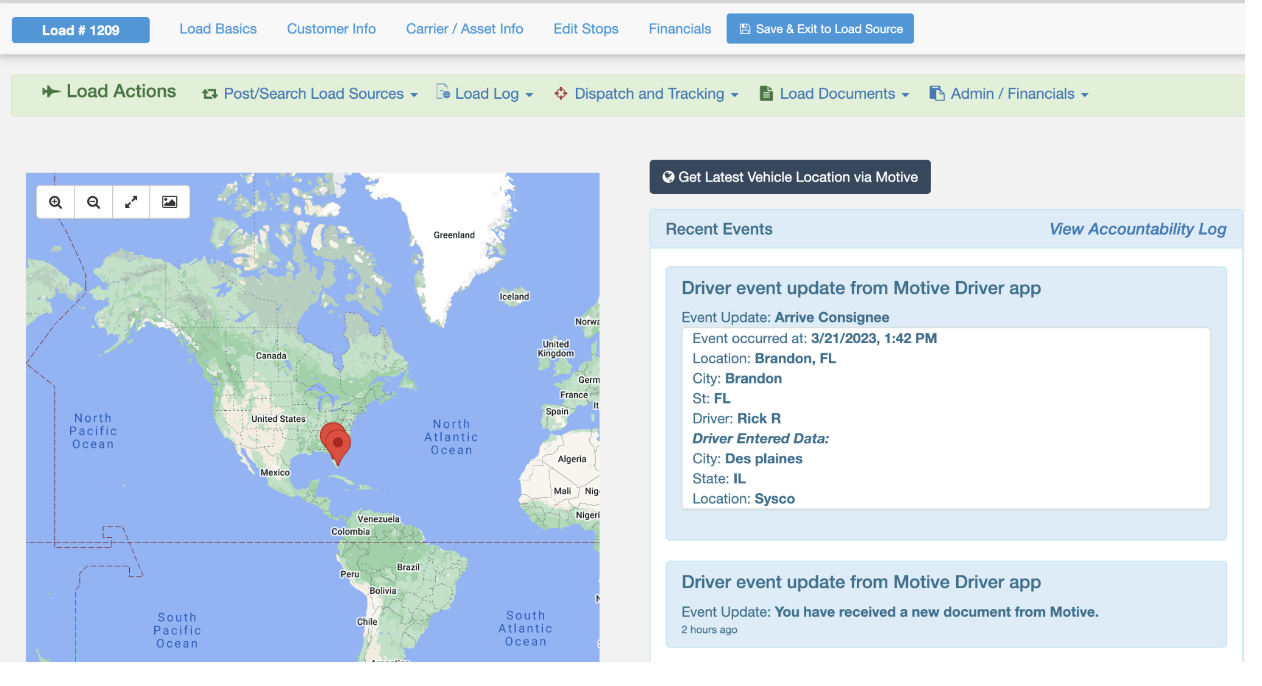
When you click to view updates, the Load Log will appear:
To view tracking breadcrumbs, select "View Load Log with map" from your shortcuts menu or Load Actions menu.
With Motive & AscendTMS, your Drivers now have the ability to upload documents via the Motive App right into Ascend! The driver will have the option within the Motive App to take a picture of any documents you need and upload them right into your Ascend account. When the Driver selects the option within the Motive app that allows them to Add Document, they will then be able to select the document type, and add a reference number to the document. If they add the load number in the reference number field, the document will be uploaded directly into the load documents for that load number. You can see an example below:
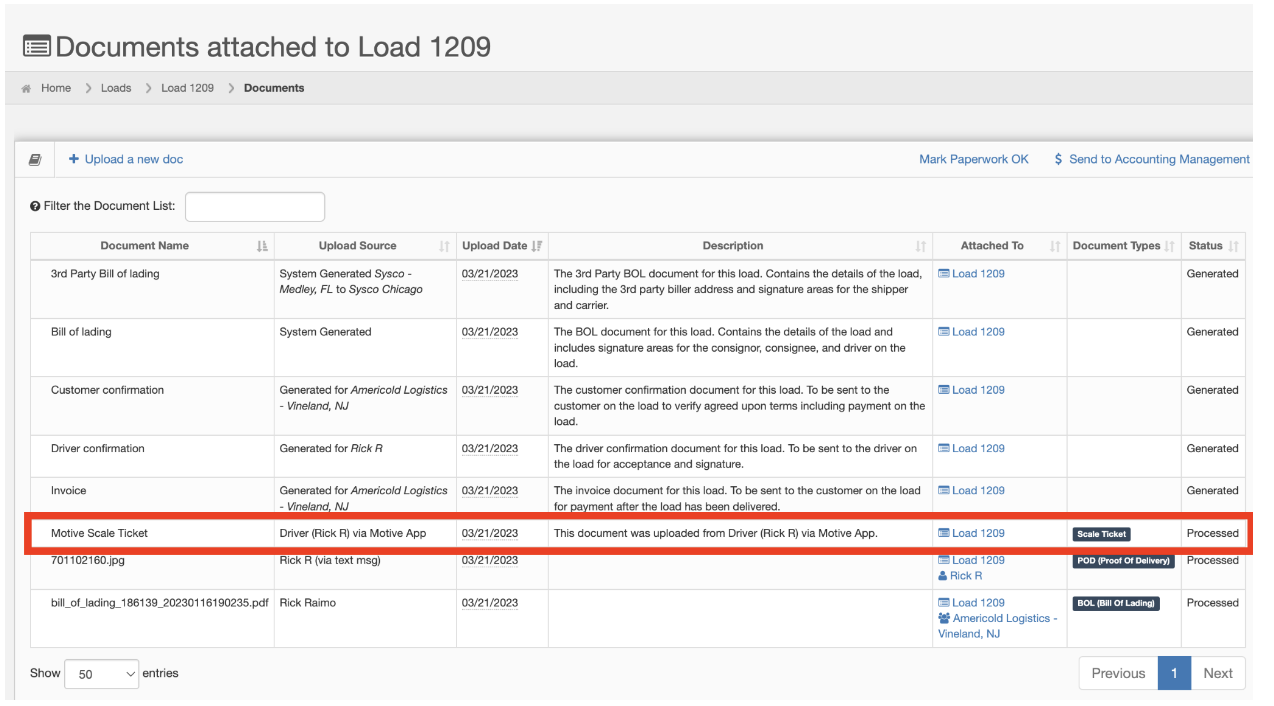
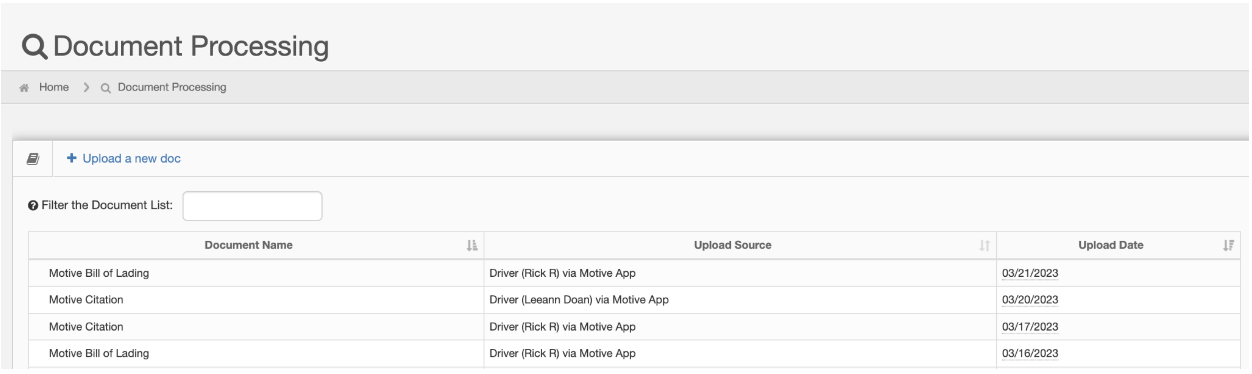
If the Driver sends a document from the Motive app into your Ascend account without a reference number, you will still receive the document, just in another place! To find documents that were sent over without a reference number, go to Doc Processing under Document Management, and you will see any documents that have been uploaded without a reference number very clearly labeled “Uploaded by Driver Via Motive App”. You can see a few examples of unprocessed documents below:
Cancelling A Motive Dispatch
In order for a Dispatch to be cancelled, the load should not be accepted by the driver. Ascend can not remove a load once it is accepted by the driver on their Motive app. If the driver accepts the load, they will have to update the stop status' to clear the load from their app.
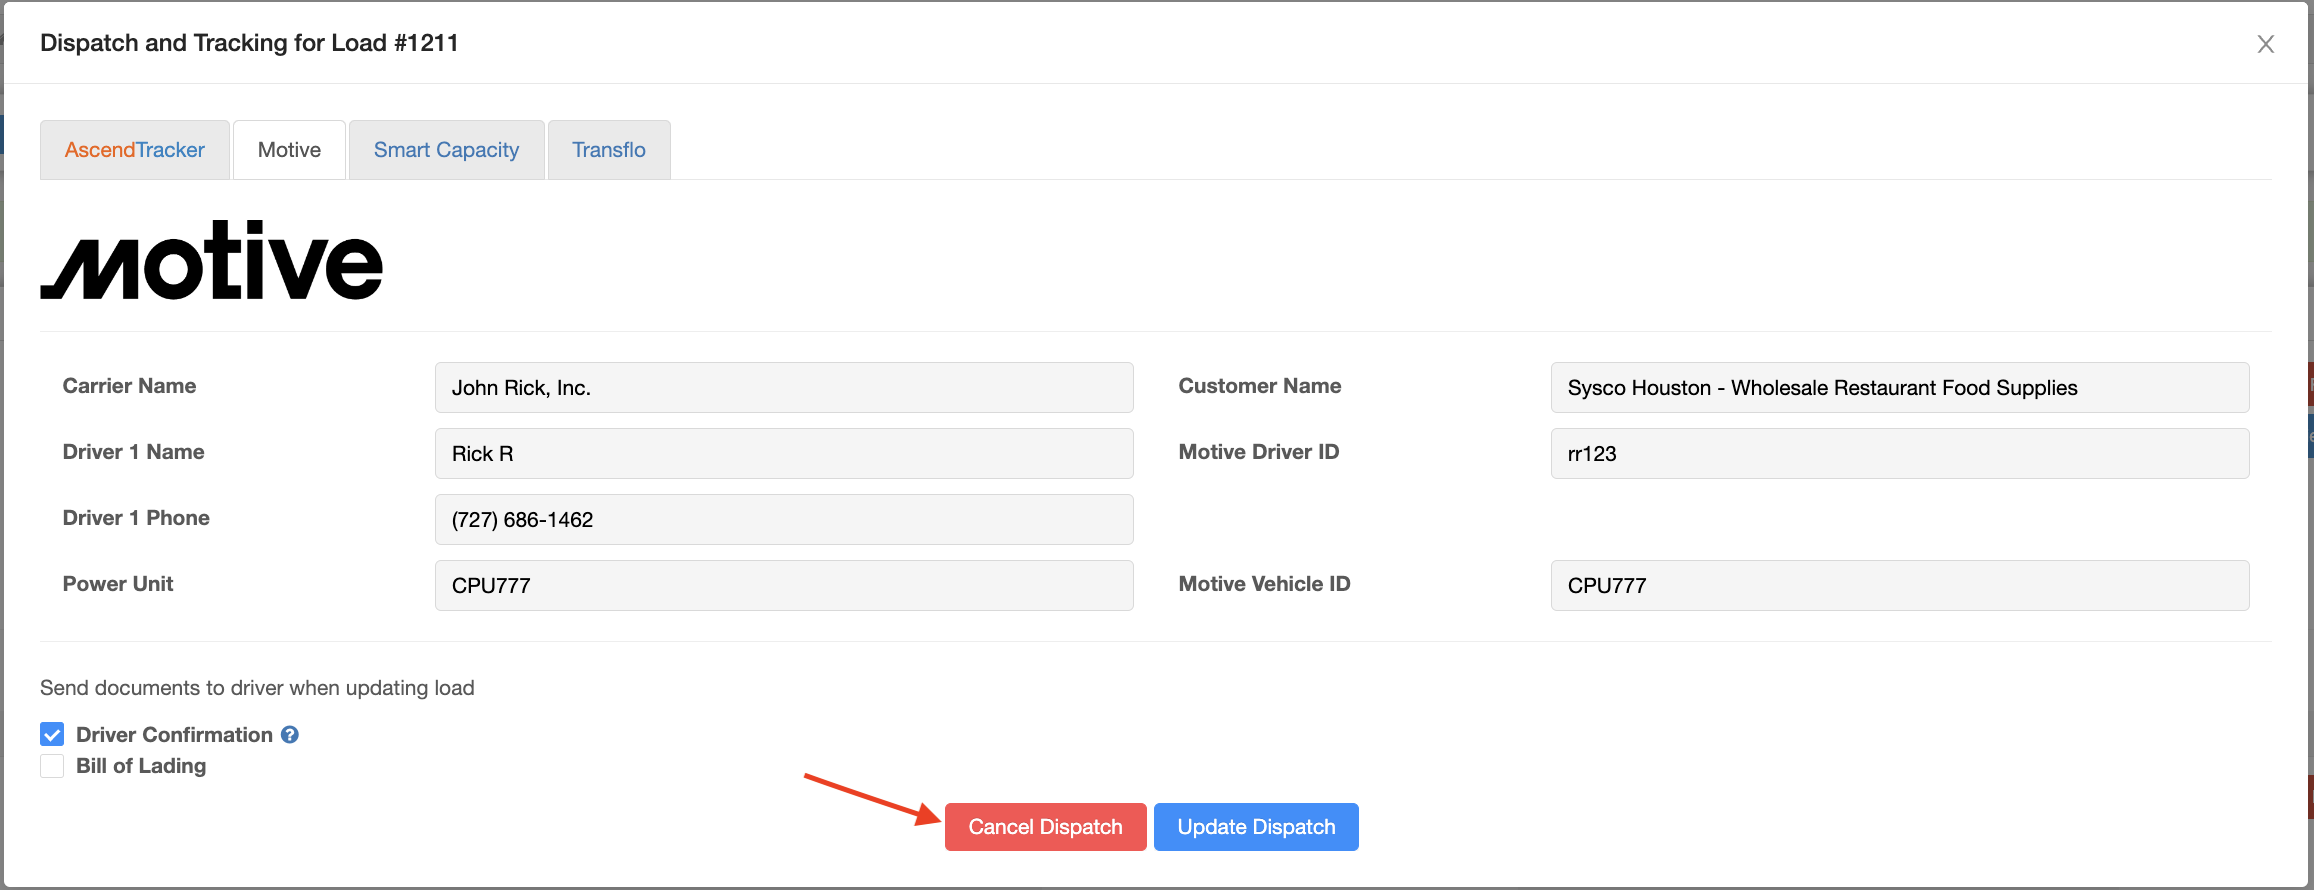
To cancel a Dispatch, you can do this from Dispatch and Tracking where you dispatched the load to the driver and click Cancel Dispatch. This will cancel the load to the driver where the will see it removed from their app.
You can also cancel the load in Ascend if the load is no longer valid, which will also cancel from the drivers app and be removed from their app
For more information on Document Management, please see our support article HERE.
Leeann Doan
Comments