Introduction
As a big part of Driver Pay Management, how to approve your driver's load-based pay items is important to understand. However, we provide 3 simple ways for you to approve your driver pay items that can be used together, or independently. This allows any company using AscendTMS the ability to customize the approval process workflow to meet their needs. (Load-based pay items are the pay items on your loads assigned to your drivers)
The ways you can approve your driver pay items are the following:
- Automate the approval process using AWE (Automated Workflow Engine) Rules.
- Approve the driver pay items directly from a load (Requires User Permissions).
- Approve driver pay items on the "Approve Load Pay Items For Driver Pay" tab within accounting (Requires User Permissions).
Set Yourself Up to Auto-Approve Your Pay Items Using AWE Rules
There are 3 AWE Rules you can utilize to automatically approve your driver's load-based pay items. To set one or more of these rules to suit your needs, simply navigate to the "Settings" menu, then select "Automated Workflow Engine", and scroll down the page until you see the AWE rules described below.
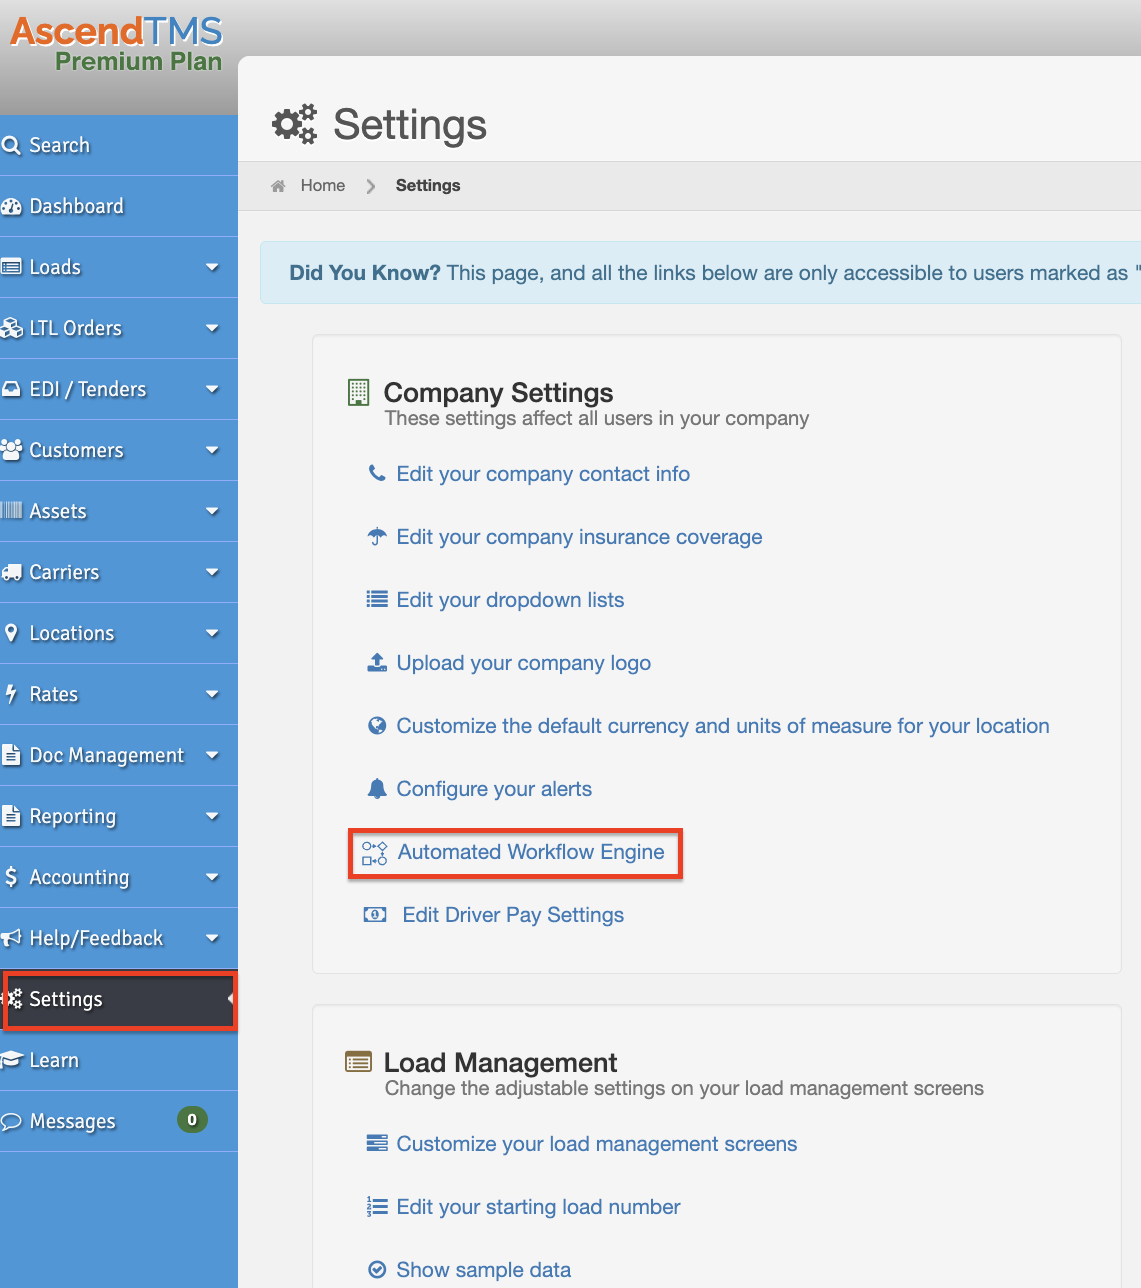
Below is the AWE Rule "Automatically mark Driver Pay LOad Items as "Approved" when load is sent to accounting." This will mark all pay items that are assigned to your drivers as "Approved" whenever loads are sent to "Accounting" in AscendTMS.

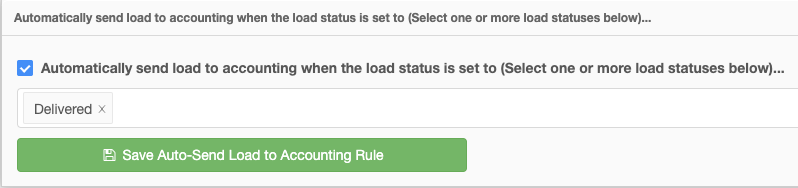
Your users can send loads to "Accounting" from the "Load Management Screen". There is an AWE Rule that will allow you to automatically send loads to accounting based on the load status or statuses of your loads as well. You can use the "Automatically send load to accounting when the load status is set to....)" rule to accomplish this. If you use both of these rules at the same time, when a load is in a certain status the load will be sent to accounting. If there are Driver Pay Items on any of your loads, they will be automatically be approved based on the above rule.
The other option you have is to use the "Automatically mark Driver Pay Load Items as "Approved" when the load status is set to ...." rule. This will automatically approve your driver's pay items on your loads when the loads are set to specific a status or statuses. This will happen without the loads being sent over to "Accounting".

Approve Pay Items From a Load
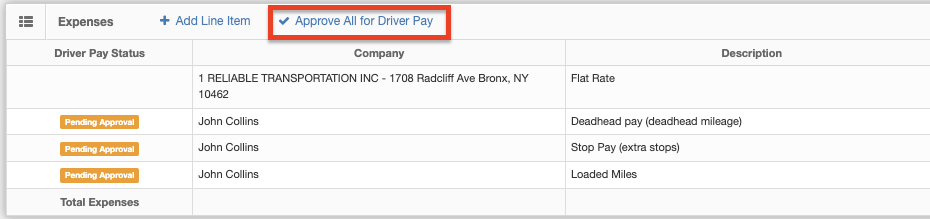
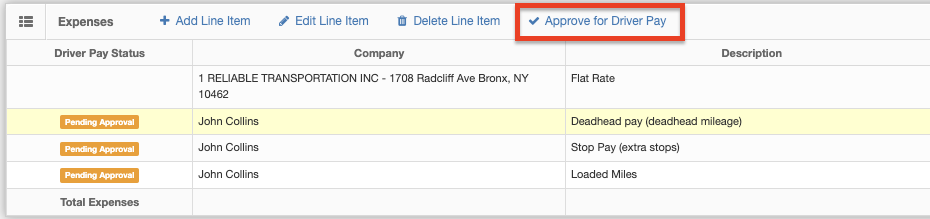
If you would prefer not to automate the load pay items approval process, don't worry, we have you covered there as well. We provide you with 2 ways you can manually approve the pay items based on your "checks and balances" process. The first option is to approve the pay items from the "Financials" tab on a load.
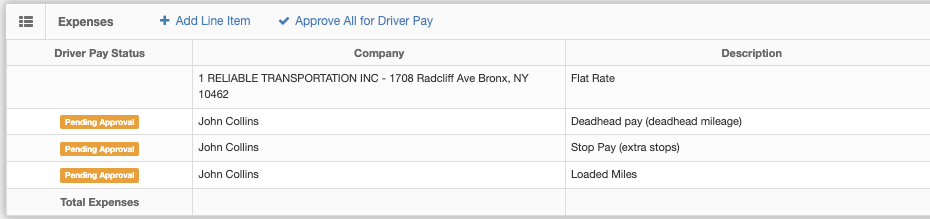
You can approve all the pay items at once by selecting the "Approve All for Driver Pay" button.
You can also approve each line item one at a time by selecting the line item and clicking the "Approve for Driver Pay" button.
If you would like to restrict who can approve your driver pay button, you can use the "User Permissions" for driver pay to do so. Click here to learn more about user permissions.
Approve Pay Items from Accounting
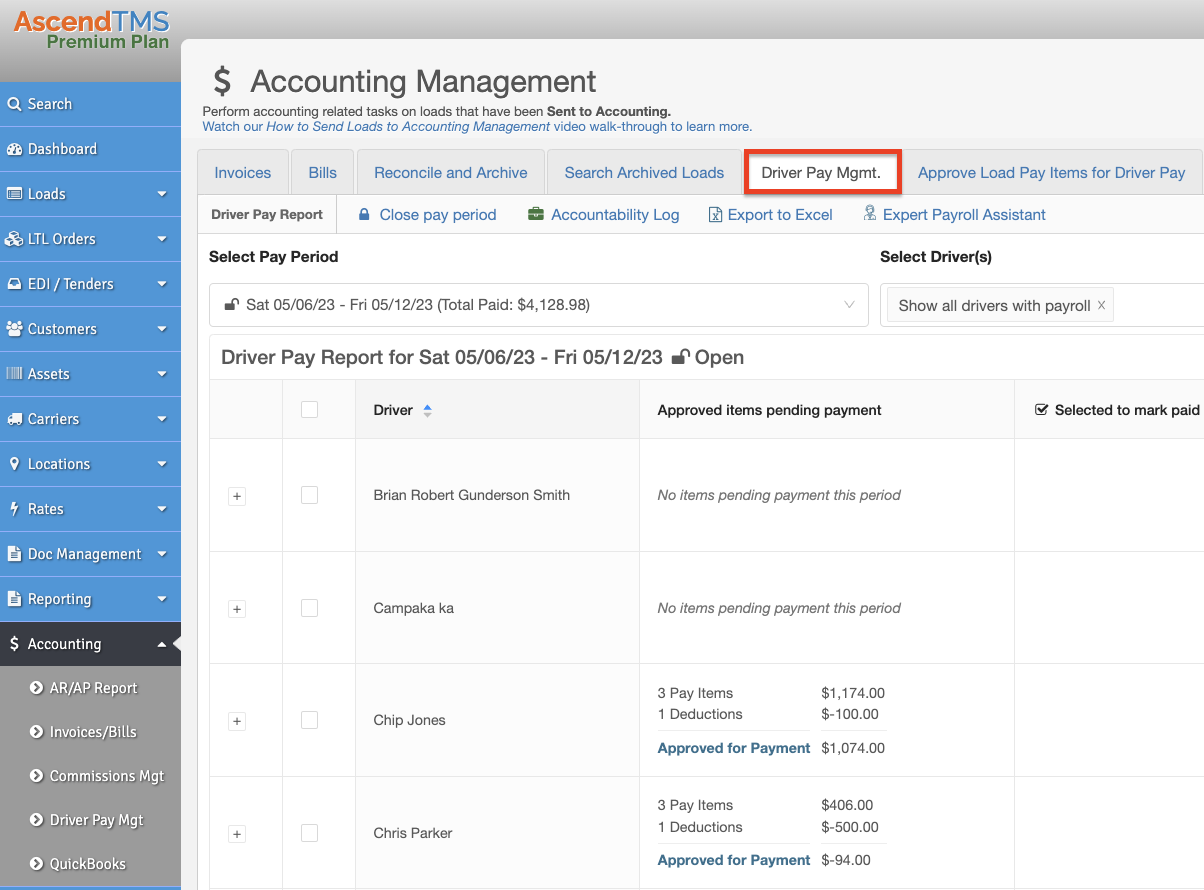
If you would prefer to view and approve your load pay items grouped by drivers, loads, and in more of a bulk approval process, we have you covered. Simply navigate to your "Accounting" menu and select "Driver Pay Mgt" and then select the "Approve Load Pay Items for Driver Pay" tab.
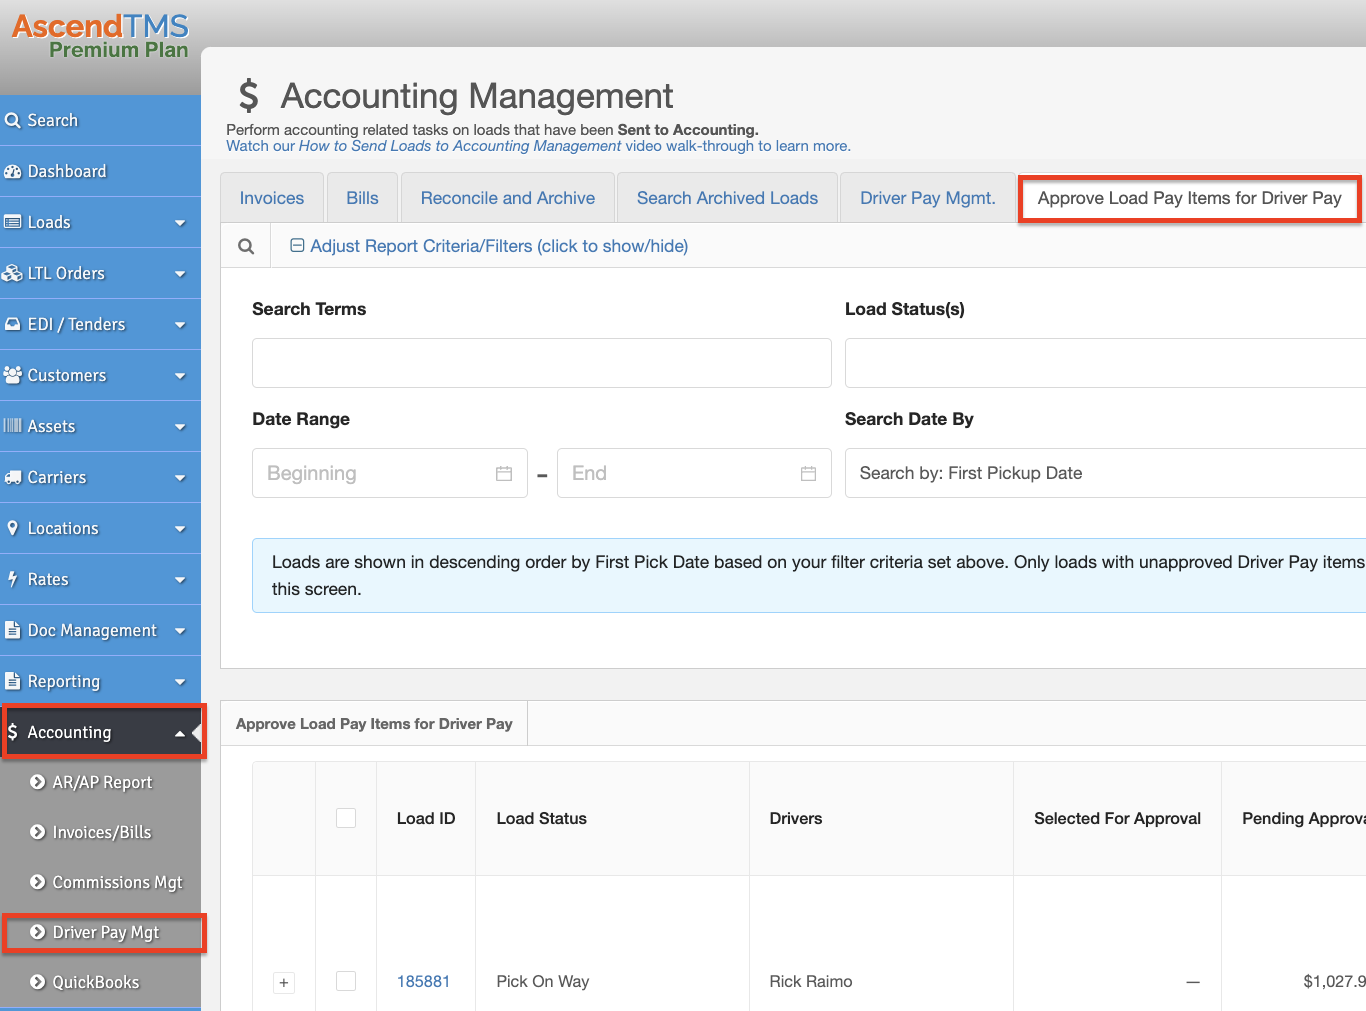
Here you will find all your "Live" loads that have Driver Pay Items assigned to them. These do not include "Archived" or "Cancelled" loads (unless you choose to include them). The loads do not need to be in "Accounting" to view them here. However, they do require to have Driver Pay Items assigned to them for them to be visible.
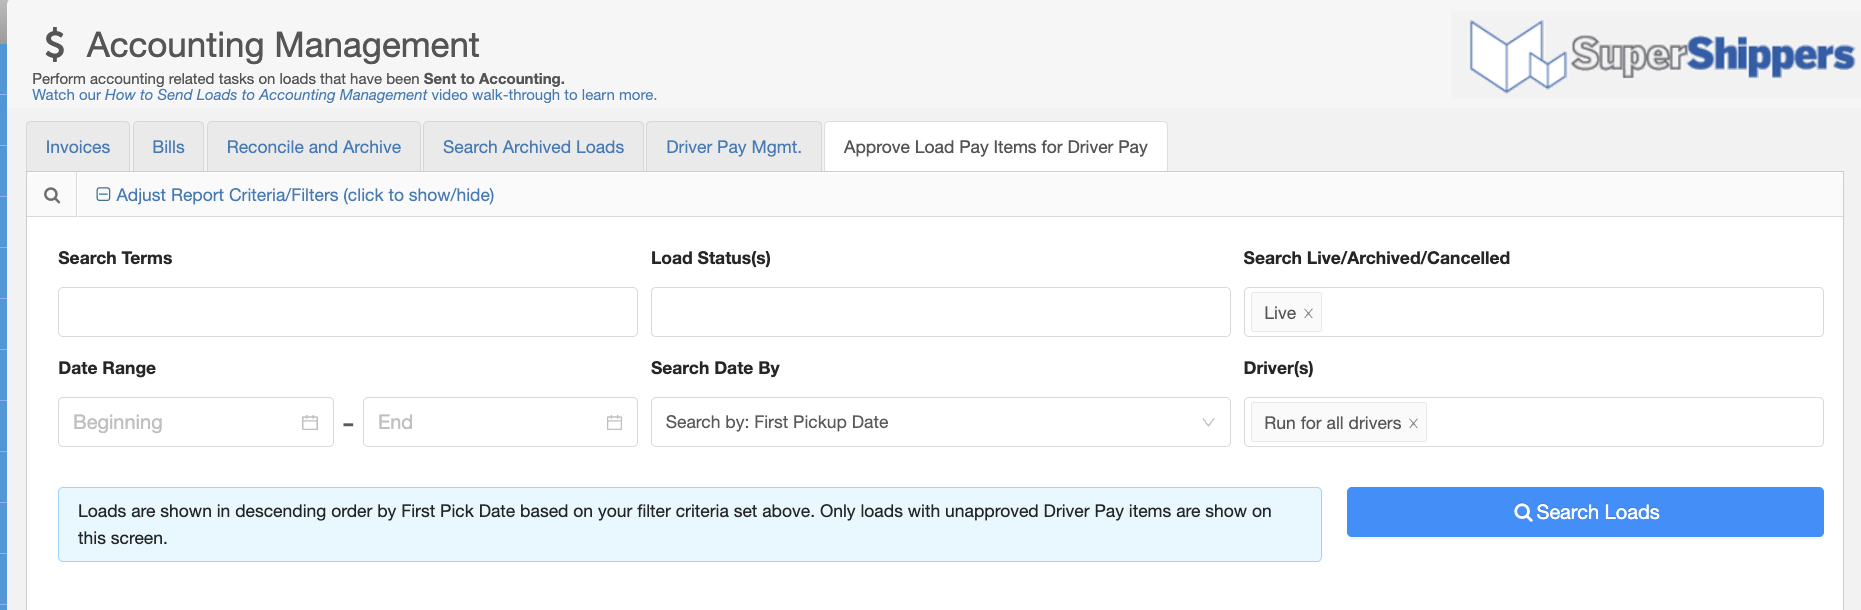
You have the ability to filter the loads down based on your needs by using the filter options below. You may filer by "Search Terms" (this allows you to type in a word to filter the loads by), "Load Status(s)", "Search Live/Archived/Canceled" (you can choose to select one or more), "Date Range", "Search Date By", and "Drivers".
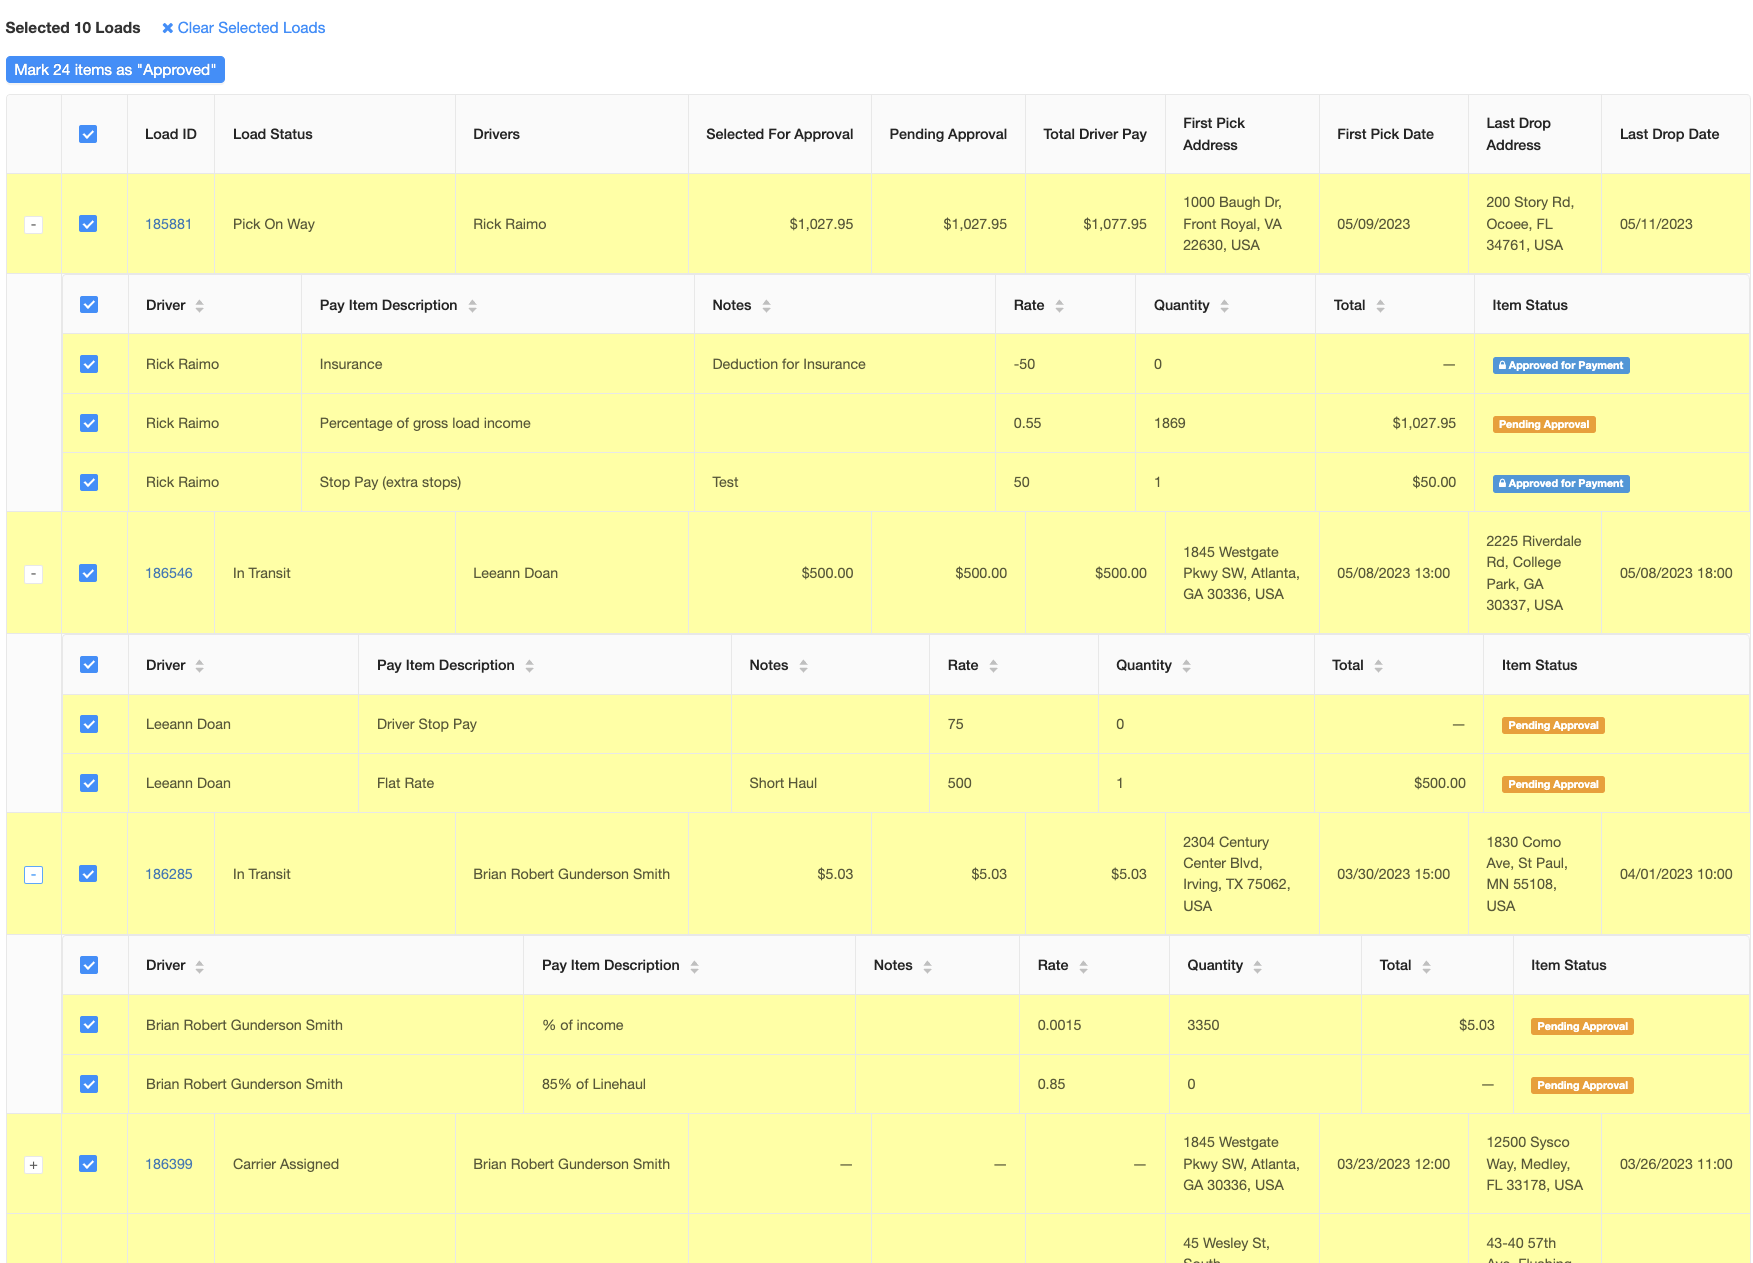
Once you have filtered the loads based on the criteria you need, you have a list of loads that include driver pay items. Each row represents a load. If you have more than one driver on a load with driver pay items, both drivers are on the same row as the load.
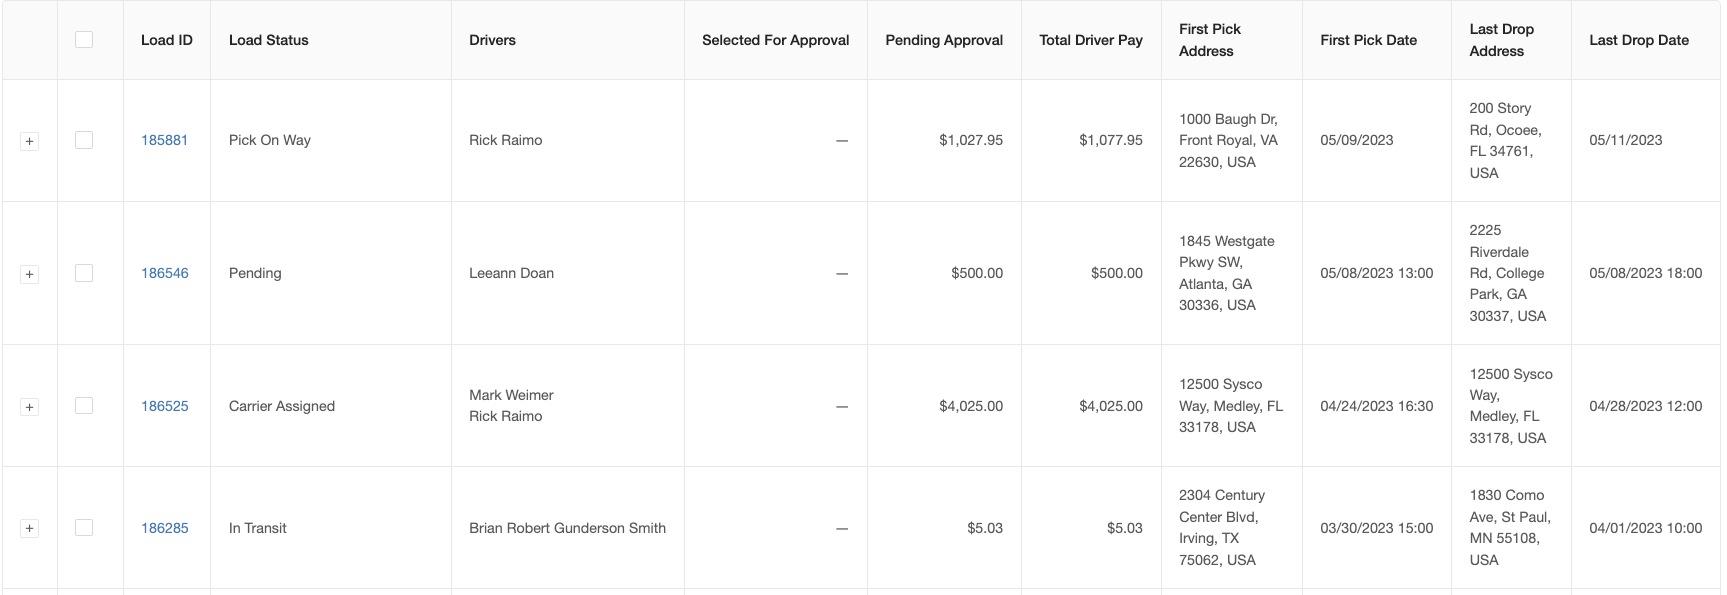
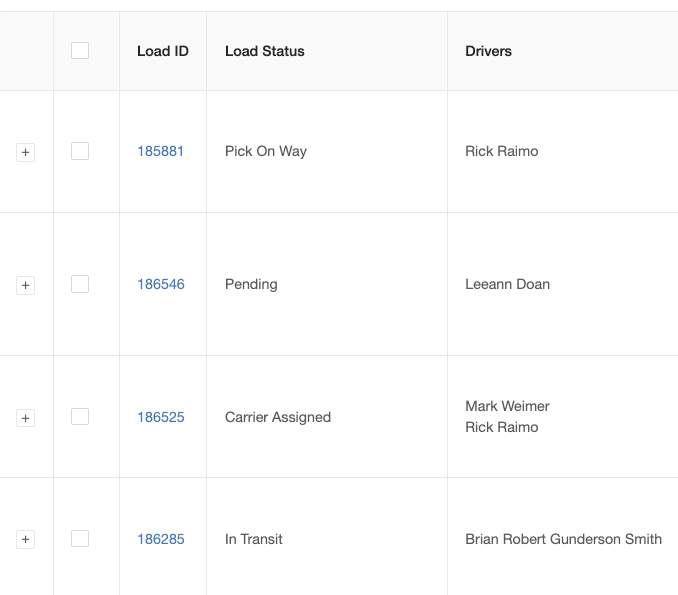
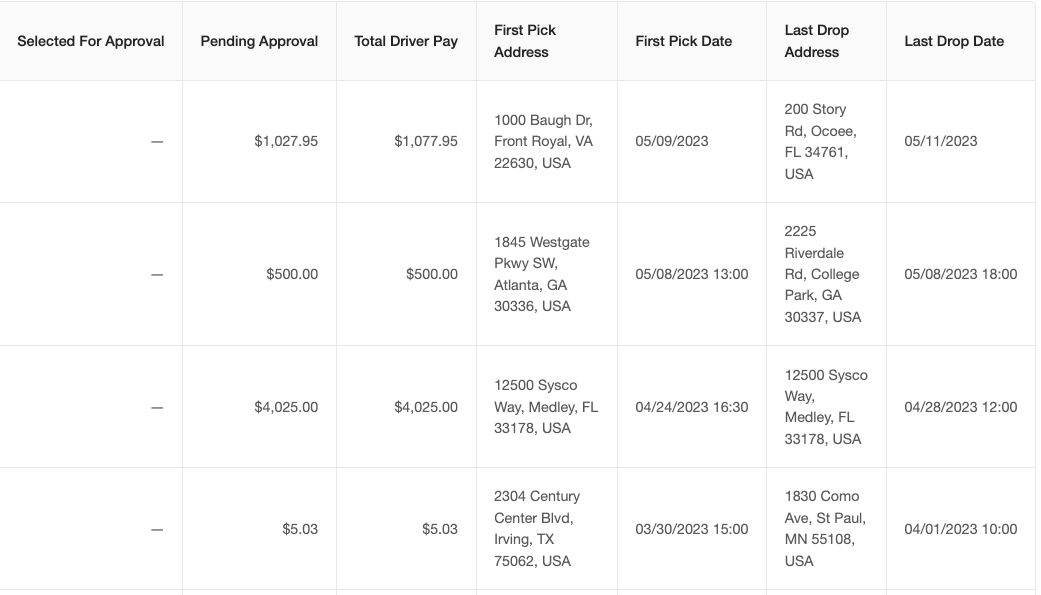
In addition to seeing the Load ID, the Load Status, and Drivers for each load, the other columns include Selected for Approval, Pending Approval, Total Driver Pay, First Pick Address, First Pick Date, Last Drop Address, Last Drop Date. To see more load details, simply click on the blue Load IDs.
To approve your Driver Pay items, click on the Plus button to the left of the Load ID. The row will expand to look like this.
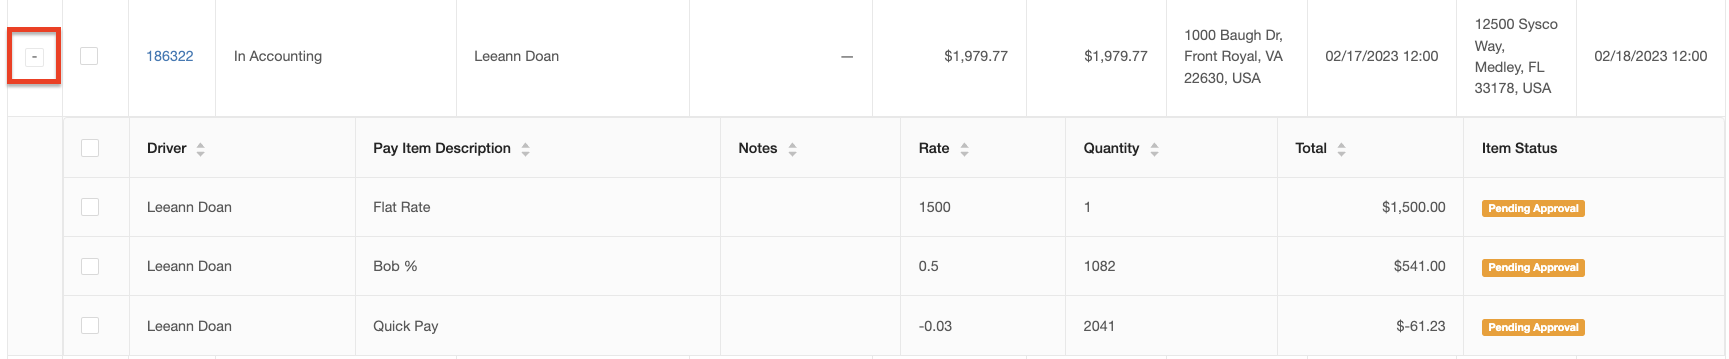
To approve a pay item, or all of the pay items for this load, just select the pay items and click the "Mark Items as Approved" button.
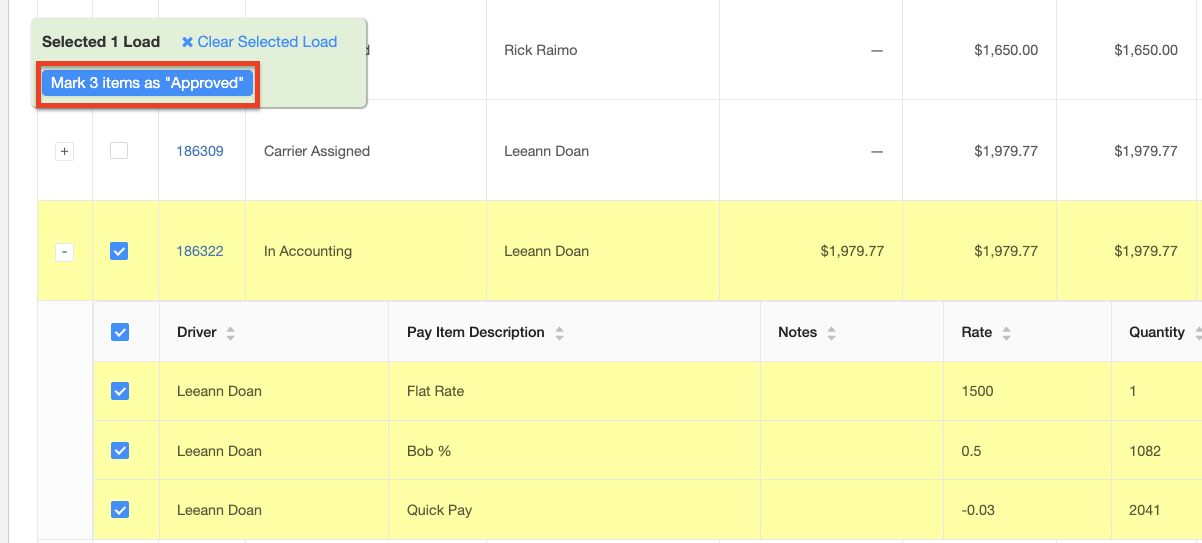
If you have many loads that have multiple pay items per load, you can select them all and approve them all at once. Please make sure that you have filtered everything properly and that you're approving only the loads and pay items that need approval.
As you approve your Driver Pay items, they will move over to the "Driver Pay Mgnt." tab in "Accounting". Here is where you can mark your pay items as paid, generate your settlement sheets, email them to your drivers, and export the data to a spreadsheet.
Chris
Comments